この記事では
前回の記事ではCapacitorを使って、HTML/JavaScriptのゲームをさくっとiPhone上で動作させることができました。
これまでこのブログで作ってきたゲームは、レトロゲームということもあり、基本的にキーボードかゲームパッドからの入力のみ対応していました。
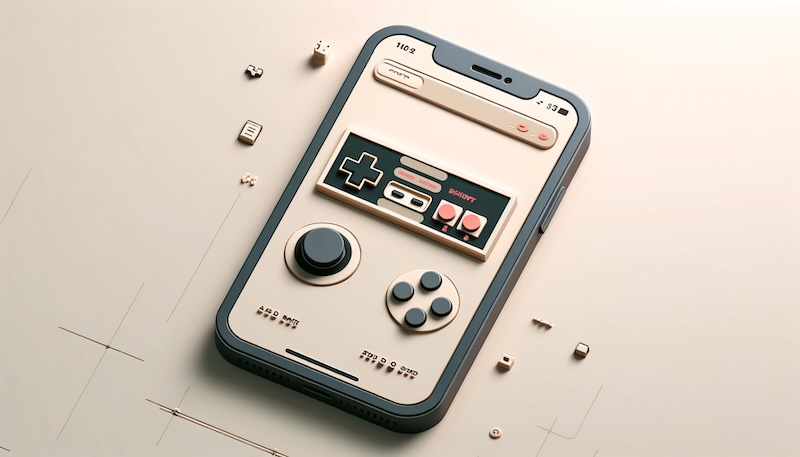
このままではiPhone上でゲームを操作できないので、下記のようにゲームパッドの代わりになるタッチパネル対応のGUIコンポーネントを作りたいと思います。ゲーム画面の上に重ねるように置きます。
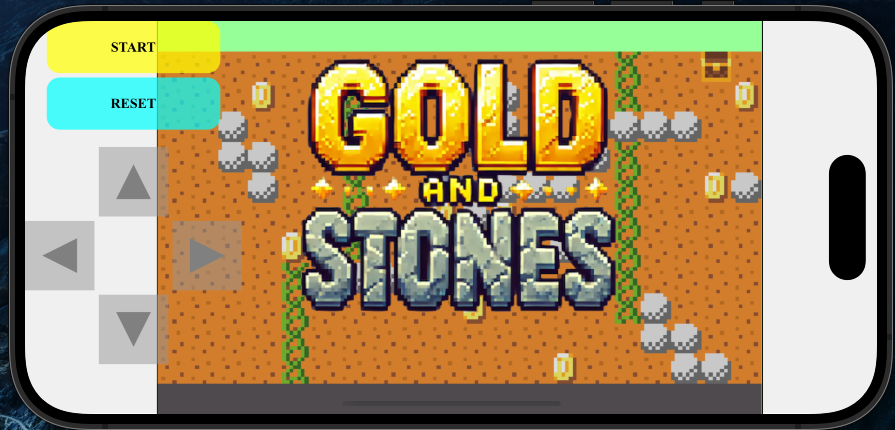
WordPressにも貼り付けることができましたので、以下が実際に動くものです。まずは黄色のSTARTボタンを押してください。ゲームパッド部分はドラッグして位置を動かせます。
ソースコード
今回のGUI部品としてのゲームパットの対応は、主にHTMLとCSSで行います。
対応前のindex.htmlはとてもシンプルな構成です。
<html>
    <center>
        <canvas id="canvasBg" width="160" height="104" style="border:1px solid #000000; background-color: #9bfff0; display:none;"></canvas>
        <canvas id="gameCanvas" width="640" height="416" style="border:1px solid #000000; background-color: #97ff97;"></canvas>
    <script type="module" src="index.js"></script>
</html>
描画バッファ用のcanvasBgと表示用のgameCanvasの2つがあるのみです。canvasBgはブラウザ上で表示されないように属性を設定しています。
対応後のindex.htmlは下記のとおりです。さらに、style.cssも必要です。
<html>
    <head>
        <link rel="stylesheet" href="./assets/style.css" type="text/css">
    </head>
    <body>
        <div id="gameContainer">
            <div id="controlsContainer">
                <div id="buttons">
                    <div class="button" id="buttonA" value="A">START</div>
                    <div class="button" id="buttonB" value="B">RESET</div>
                </div>
                <div id="dpad">
                    <div class="dpad-button" id="dpad-up" value="up">
                        <svg width="50" height="50" xmlns="http://www.w3.org/2000/svg">
                            <polygon points="25,5 45,45 5,45" fill="gray" /></svg
                        >
                    </div>
                    <div class="dpad-button" id="dpad-left" value="left">
                        <svg width="50" height="50" xmlns="http://www.w3.org/2000/svg">
                            <polygon points="5,25 45,5 45,45" fill="gray" /></svg
                        >
                    </div>
                    <div class="dpad-button" id="dpad-right" value="right">
                        <svg width="50" height="50" xmlns="http://www.w3.org/2000/svg">
                            <polygon points="45,25 5,5 5,45" fill="gray" /></svg
                        >
                    </div>
                    <div class="dpad-button" id="dpad-down" value="down">
                        <svg width="50" height="50" xmlns="http://www.w3.org/2000/svg">
                            <polygon points="25,45 5,5 45,5" fill="gray" />
                        </svg>
                    </div>
                </div>
            </div>
            <div id="canvasContainer">
                <canvas id="gameCanvas" style="border:1px solid #000000; background-color: #97ff97;"></canvas>
            </div>
        </div>

        <canvas id="canvasBg" width="160" height="104" style="border:1px solid #000000; background-color: #9bfff0; display:none;"></canvas>

        <script type="module" src="index.js"></script>

        <script>
            // Disable touch events outside buttons
            document.body.addEventListener('touchstart', function(event) {
                if (!event.target.closest('.dpad-button') && !event.target.closest('.button')) {
                    event.preventDefault();
                }
            }, { passive: false });

            // Make controls draggable
            let isDragging = false;
            let offsetX, offsetY;

            controlsContainer.addEventListener('touchstart', (e) => {
                isDragging = true;
                const touch = e.touches[0];
                offsetX = touch.clientX - controlsContainer.getBoundingClientRect().left;
                offsetY = touch.clientY - controlsContainer.getBoundingClientRect().top;
                controlsContainer.style.cursor = 'grabbing';
            });

            window.addEventListener('touchmove', (e) => {
                if (isDragging) {
                    const touch = e.touches[0];
                    controlsContainer.style.left = `${touch.clientX - offsetX}px`;
                    controlsContainer.style.top = `${touch.clientY - offsetY}px`;
                }
            });

            window.addEventListener('touchend', () => {
                if (isDragging) {
                    isDragging = false;
                    controlsContainer.style.cursor = 'grab';
                }
            });

            controlsContainer.addEventListener('mousedown', (e) => {
                isDragging = true;
                offsetX = e.clientX - controlsContainer.getBoundingClientRect().left;
                offsetY = e.clientY - controlsContainer.getBoundingClientRect().top;
                controlsContainer.style.cursor = 'grabbing';
            });

            window.addEventListener('mousemove', (e) => {
                if (isDragging) {
                    controlsContainer.style.left = `${e.clientX - offsetX}px`;
                    controlsContainer.style.top = `${e.clientY - offsetY}px`;
                }
            });

            window.addEventListener('mouseup', () => {
                if (isDragging) {
                    isDragging = false;
                    controlsContainer.style.cursor = 'grab';
                }
            });

        </script>
    </body>
</html>
body, html {
margin: 0;
padding: 0;
width: 100%;
height: 100%;
overflow: hidden;
}
#gameContainer {
display: flex;
width: 100%;
height: 100%;
background-color: #f0f0f0;
}
#controlsContainer {
position: absolute;
display: flex;
flex-direction: column;
align-items: center;
justify-content: column;
width: 250px;
height: 400px;
gap: 20px;
cursor: grab;
background-color: rgba(255,255,255,0.08)
}
#dpad {
width: 250px;
height: 150px;
display: grid;
grid-template-columns: repeat(3, 1fr);
grid-template-rows: repeat(3, 1fr);
gap: 5px;
}
.dpad-button {
width: 80px;
height: 80px;
display: flex;
justify-content: center;
align-items: center;
background-color: rgba(150, 150, 150, 0.5);
user-select: none;
}
#dpad-up { grid-column: 2; grid-row: 1; }
#dpad-left { grid-column: 1; grid-row: 2; }
#dpad-right { grid-column: 3; grid-row: 2; }
#dpad-down { grid-column: 2; grid-row: 3; }
#buttons {
width: 200px;
display: grid;
flex-direction: column;
justify-content: center;
gap: 5px;
}
.button {
width: 200px;
height: 60px;
border-radius: 15px;
display: flex;
justify-content: center;
align-items: center;
font-weight: bold;
color: black;
user-select: none;
}
#buttonA { background-color: rgba(255, 255, 0, 0.7); }
#buttonB { background-color: rgba(0, 255, 255, 0.7); }
#canvasContainer {
margin-left: 20px;
flex-grow: 1;
display: flex;
justify-content: center;
align-items: center;
}
#gameCanvas {
background-color: #fff;
max-width: 100%;
max-height: 100%;
}画面上の構成物の階層構造
ソースコードの量は結構増えましたが、構成自体はそれほど複雑ではありません。
画面上に表示されないものも含めて、HTMLの <…> <…/>タグで記述されるエレメントの階層構造の関係は下記図に示すとおりです。
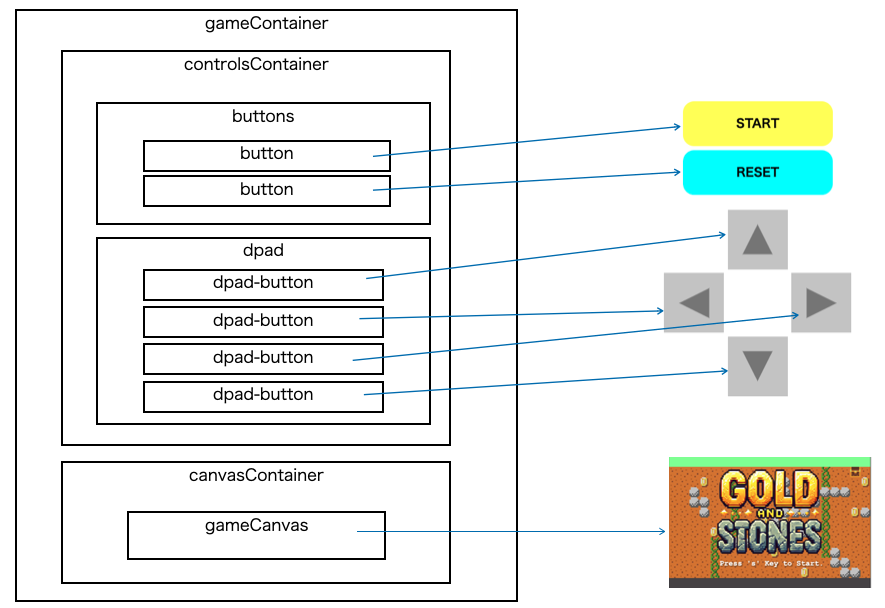
それぞれのエレメントの形状や大きさ、色などはstyle.cssで定義されます。
START, RESET, 上下左右ボタンは、controlsContainerという見えないコンポーネントの上に乗っています。下記のcssの定義を見ればわかるように、大きさは250x400px、背景色は白ですが、αチャネルを0.08にしているのでほぼ透明にしています。
#controlsContainer {
    position: absolute;
    display: flex;
    flex-direction: column;
    align-items: center;
    justify-content: column;
    width: 250px;
    height: 400px;
    gap: 20px;
    cursor: grab;
    background-color: rgba(255,255,255,0.08) αチャネルでほぼ透明にしている
}
ここの領域は、マウスやタッチでドラッグして位置を移動させることができます。
ゲームパッドをドラッグして移動させる方法
実現方法としては、マウスやタッチイベントから座標情報を拾って、START/RESET/上下左右ボタンを載せているcontrolsContainerの座標を移動させます。
下記はタッチイベントでの処理を抜粋したものです。
controlsContainer.addEventListener('touchstart', (e) => {
  controlContainerがタッチされた時の処理
});

window.addEventListener('touchmove', (e) => {
  タッチしながら動いた時の処理
  タッチしている位置に合わせてcontrolsContainerの座標を変更する。
  controlsContainerの外に出るのでwindowに対してイベントを拾う
});

window.addEventListener('touchend', () => {
  タッチを離した時の処理。
  controlsContainerの外に出るのでwindowに対してイベントを拾う
});
touchmove, touchendはcontrolContainerに対して、addEventListener() しても動作はしますが、勢いよくマウスや指を動かした時に、座標がいきなりcontrolContainerの枠外になると、挙動がおかしくなります。
さて、controlsContainerをドラッグして移動させるのは、controlContainerの座標を変更することで行います。その際の考え方は下記の図に示すとおりです。
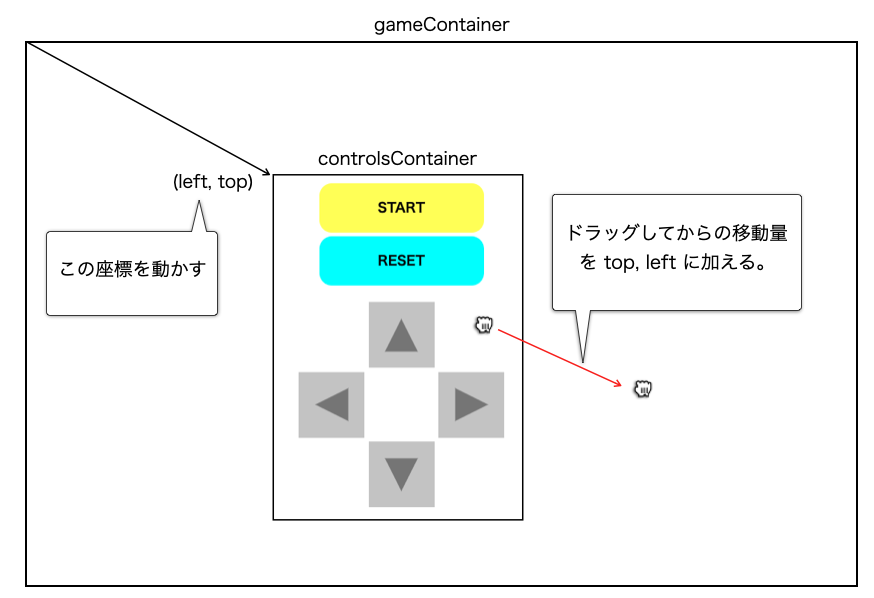
ドラッグした時の座標の計算は下記の式で表されます。(x1, y1) をタッチした時の座標、(x2, y2) をドラッグして動かした後の座標とします。
new_left = x2 - x1 + left
             = x2 - (x1 - left)  → x1 - left をoffsetとしてtouchstart時に計算する

new_top = y2 - y1 + top
             = y2 - (y1 - top)  → y1 - left をoffsetとしてtouchstart時に計算する
実際の実装は下記の部分です。
            controlsContainer.addEventListener('touchstart', (e) => {
                isDragging = true;
                const touch = e.touches[0];
                offsetX = touch.clientX - controlsContainer.getBoundingClientRect().left;
                offsetY = touch.clientY - controlsContainer.getBoundingClientRect().top;
                controlsContainer.style.cursor = 'grabbing';
            });

            window.addEventListener('touchmove', (e) => {
                if (isDragging) {
                    const touch = e.touches[0];
                    controlsContainer.style.left = `${touch.clientX - offsetX}px`;
                    controlsContainer.style.top = `${touch.clientY - offsetY}px`;
                }
            });
まとめ
さて、iPhone上でレトロゲームを操作するために、ソフトウェア・ゲームパッドを作成しました。標準的なHTML/CSSの機能を使うことで、やりたいことが実現できました。この部分に関しては、筆者も学びながら、大いにHTML/CSSのポテンシャルを感じました。
世の中にある多くのフレームワークはこの基礎技術の上の成り立っています。複雑なアプリやGUIを構築したいなら何かしらのフレームワークを選択するのが賢明ですが、シンプルなGUIであればHTML/CSSの標準機能で十分かもしれません。
