Let’s make a simple game using just HTML and JavaScript, without any game engines or libraries.
This is for people who:
Want to try making a game but have no idea where to start.
Just want to make a simple game without diving into complex tools like Unity or Unreal Engine.
This guide is aimed at those who already have some programming knowledge.
What’s Covered in This Article
Before we dive into making a game, we’ll first set up the basic working environment.
Specifically, we’ll create a demo where a ball bounces around on a black screen that runs in a web browser.
What You Need to Make a Game
To make a game that runs on a web browser, you’ll need at least the following:
- A PC: Any laptop or desktop will do. It doesn’t need the latest OS; a used PC from around 10 years ago will work fine.
- A Web Browser: Use whichever you prefer. Standard options like Internet Explorer or Edge on Windows, and Safari on macOS, are perfectly fine.
- A Text Editor: Use any text editor you like, as long as it can save and edit files like
index.html.
If you don’t have a PC, I recommend getting a used laptop. With a laptop, you won’t need to buy extra peripherals like a keyboard, monitor, or mouse to get started.
Run the Sample Demo First
First, try running the sample demo. We’ll explain what’s inside later.
For beginners, writing code without knowing if it will work can be stressful. The process can be discouraging before you even get it running. So, let’s eliminate that stress right from the start.
Once you have the basic working environment, you can tweak the program to see what changes occur.
The same applies to Unity and Unreal Engine, as they provide sample projects to start with.
Here’s the source code for the demo where the ball bounces around. Copy this and paste it into a text editor, saving it as index.html. Open the saved file in your browser. On Windows or macOS, double-clicking the file in Explorer or Finder will open it in the default browser.
<html>
<body>
    <canvas id="gameCanvas" width="800" height="400"
            style="border:1px solid #000000; background-color: #000;"></canvas>
    <script>
        const canvas = document.getElementById('gameCanvas');
        const context = canvas.getContext('2d');

        // Ball
        const ballRadius = 10;
        let ballX = canvas.width / 2;
        let ballY = canvas.height / 2;
        let ballSpeedX = 2;
        let ballSpeedY = 2;

        function drawBall() {
            context.fillStyle = '#fff';
            context.fillRect(ballX-ballRadius/2, ballY-ballRadius/2, ballRadius*2, ballRadius*2)
        }

        function update() {
            // update the ball position
            ballX += ballSpeedX;
            ballY += ballSpeedY;

            // Handling when the ball goes beyond the top or bottom boundaries.
            if (ballY + ballRadius > canvas.height || ballY - ballRadius < 0) {
                ballSpeedY = -ballSpeedY;
            }

            // Handling when the ball goes beyond the left or right boundaries.
            if (ballX - ballRadius < 0 || ballX + ballRadius > canvas.width) {
                ballSpeedX = -ballSpeedX;
            }
        }

        function draw() {
            context.clearRect(0, 0, canvas.width, canvas.height);
            drawBall();
            update();
        }

        setInterval(draw, 10);
    </script>
</body>
</html>
I’m a Mac user. Here’s how it looks when opened from Safari.
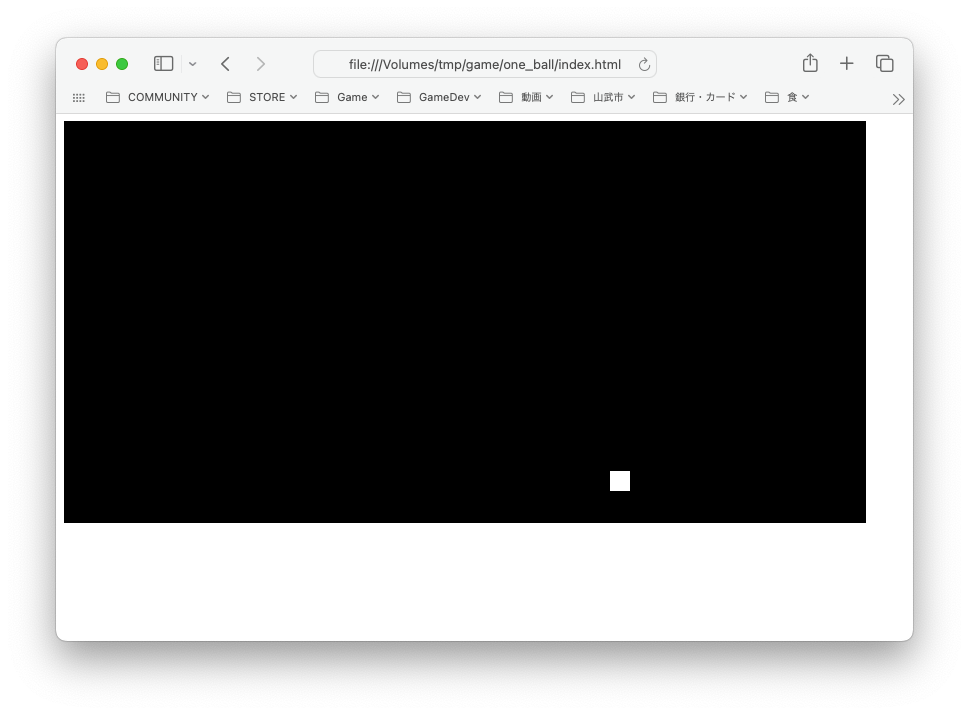
Did the demo work? Next, let’s break down the components of this demo.
The Minimum Components Needed to Create a Game
To create a game, you need to have the following components available within your program:
- Drawing on the Screen: You need to be able to draw images, or you can’t get started. Here, we’ll create a game screen within the browser.
- Capturing User Input: You need to capture input from the mouse or keyboard within your program.
Additionally, if you want to add sound effects or music, you need to be able to control that through the program. But let’s save that for another time.
The demo introduced in this article only includes the first component.
Now, let’s take a closer look at the method for drawing images, specifically the content of the index.html file we discussed earlier.
HTML (HyperText Markup Language)
The source code in the index.html file uses a markup language called HTML and a programming language called JavaScript.
HTML defines the logical structure of a document. Simply put, it enables you to display the document in a neat layout on the browser.
In the demo’s source code, the following parts are HTML:
<html>
<body>
    <canvas id="gameCanvas" width="800" height="400"
            style="border:1px solid #000000; background-color: #000;"></canvas>
    <script>
    ....
    ....
    </script>
</body>
</html>
You might notice that elements like <html>, <body>, and <script> are enclosed with names and nested in a hierarchical structure. The sections enclosed in <> are called tags. Tags without a / are opening tags, and those with a / are closing tags.
Each tag has a name and serves a different purpose. For now, it’s important to understand the nested structure of tags and to know the following tags that are necessary for making a game:
<canvas></canvas>: Defines a drawing area to display on the web browser.<script></script>: The actual program that runs the game is written between these tags, using JavaScript.
Let’s go into detail about these two tags.
Creating a Free Drawing Area Within the Browser
The <canvas> tag in the example defines an area where you can freely draw in the web browser. It’s aptly named ‘canvas.’
 <canvas id="gameCanvas" width="800" height="400"
            style="border:1px solid #000000; background-color: #000;"></canvas>
The opening tag <canvas ... > contains the attributes set for the canvas.
id="gameCanvas": This is the name of the canvas, needed for later use within the program. You can define multiple canvases, so you’ll need a name to reference them.width="800": This is the width of the canvas in pixels, indicating how many pixels can be placed.height="400": This is the height of the canvas.style="border: ...; background-color: ...": These are settings for drawing the border of the canvas and its background color. For now, we won’t change these.
The meanings of these settings can be easily found by searching online, so if you want to know more details, feel free to look them up. Generally, it’s sufficient to look things up when you need them.
The width and height are pretty straightforward, so you might enjoy tweaking them to see the changes.
Drawing the White Ball on the Canvas
Let’s see how we draw the white ball, the most interesting part.
The processing happens in JavaScript, written between the <script> and </script> tags.
        function drawBall() {
            context.fillStyle = '#fff';
            context.fillRect(ballX-ballRadius/2, ballY-ballRadius/2, ballRadius*2, ballRadius*2)
        }
An object called context assigns a value to the fillStyle variable and calls the fillRect() function. The fillRect() function draws a rectangle. The value '#fff' assigned to fillStyle represents the color white.
fillRect (x, y, width, height):
x, y : Coordinates、width : Width、height: Height
Where does context come from?
        const canvas = document.getElementById('gameCanvas');
        const context = canvas.getContext('2d');
context is an object obtained from another object called canvas, which itself is obtained from document by specifying the name ‘gameCanvas.’
You might recognize ‘gameCanvas.’ It’s the name of the canvas area defined in the HTML.
 <canvas id="gameCanvas" width="800" height="400"
            style="border:1px solid #000000; background-color: #000;"></canvas>
You can start to see their relationships. In diagram form, it looks like this:
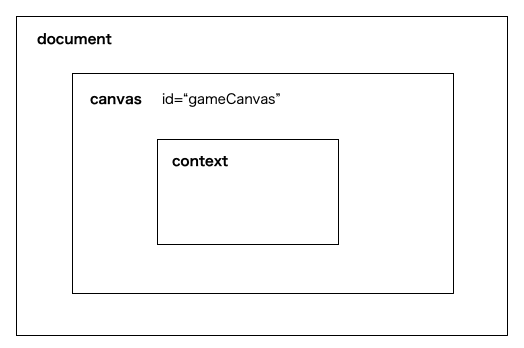
Where does document come from? It’s the parent object at the root. Simply put, it’s the content enclosed within <html> ... </html>.
This object can be referenced from anywhere within JavaScript. Also, you can think of it as being able to retrieve all the information defined within <html> ... </html> through the document object.
Animating the Moving White Ball
This is the concept behind screen updates for all games. Here’s how the ball’s movement animation is created:
- Fill the entire screen with a color (in this demo, it’s black).
- Draw the object you want to display at the desired coordinates.
- Update the object’s coordinates.
This process is repeated endlessly.
In the source code, this is done in the draw() function.
       function draw() {
            context.clearRect(0, 0, canvas.width, canvas.height);
            drawBall();
            update();
        }
What happens if you don’t fill the screen in step 1? The quickest way to find out is to try it out. Remove line 38 and see what happens.
How often is the draw() function called?
setInterval(draw, 10);That’s the answer. This function calls draw() at 10 ms (milliseconds) intervals. After drawing once, it waits for 10 ms before drawing again.
And that’s it for the explanation in this article. The part about updating the ball’s coordinates and bouncing it off the edges is very simple, so you should be able to understand it by reading the source code.
This will likely be explained in the upcoming game creation section as well.
In the Next Article
So far, we’ve covered how to draw something on the browser and animate it.
In the next article, we’ll introduce how to capture user input (mouse or keyboard) and make objects in the game world react to it.


コメント