This guide is for those who want to create a game using only JavaScript, without using game engines or libraries.
This is for people who:
Want to make a game but don’t know where to start.
Want to create a simple game without the hassle of using Unity or Unreal Engine.
This guide is aimed at those who already have some programming knowledge.
What You’ll Make in This Article
We’re going to create an automatic repairing block gimmick from the demo in the previous article.
You can destroy the blocks with a laser. After a while, the blocks will automatically repair themselves.
x … Dig left、c … Dig right
j … Up、m … Down、j … Left、l … Right
Articles to Read Before This One
Source Code
Here’s how the demo’s source code is structured:
.
├── Block.js
├── Chara.js
├── World.js
├── index.html
├── index.js
└── spritesheet.png
Since the last time, we’ve added Block.js. World.js has also been significantly changed.
const BLOCK_RECOVER_SEC = 7;

const State = {
    NORMAL: 'NORMAL',
    BREAKING: 'BREAKING',
    RECOVER: 'RECOVER',
    BROKEN: 'BROKEN',
}

const anime_table = {
    NORMAL: { frames: [16], frame_interval: 1},
    BREAKING: { frames: [17,18,19,20], frame_interval: 20 },
    RECOVER: { frames: [19,18,17], frame_interval: 60 },
    BROKEN: { frames: [20], frame_interval: 60*BLOCK_RECOVER_SEC },
};

const next_state_table = new Map([
    [State.NORMAL, State.NORMAL],
    [State.BREAKING, State.BROKEN],
    [State.BROKEN, State.RECOVER],
    [State.RECOVER, State.NORMAL],
]);

export class EBlock {
    constructor() {
        this.state = State.NORMAL;
        this.anime_index = 0;
        this.frame_count = 0;
        this.sprite = 16;
    }

    can_go_through() { return this.state != State.NORMAL; }

    can_up() { return false; }

    can_stand_on() { return this.state == State.NORMAL; }

    can_hang() { return false; }

    sprite_no() { return this.sprite; }

    dig() {
        if (this.state != State.NORMAL)
            return;
        this.state = State.BREAKING;
    }

    update () {
        if (!this.anime_update()) {
            this.state = next_state_table.get(this.state);
            this.anime_index = 0;
            this.frame_count = 0;
        }
    }

    anime_update() {
        let frames = anime_table[this.state].frames;

        if (this.anime_index >= frames.length) {
            this.anime_index = 0;
            return false;
        }

        if (this.frame_count >= anime_table[this.state].frame_interval) {
            this.anime_index++;
            this.frame_count = 0;
        }
        this.frame_count++;

        if (this.anime_index < frames.length) {
            this.sprite = frames[this.anime_index];
        }

        return true;
    }
}
import {drawSprite} from "./index.js"
import { EBlock } from "./Block.js"
const MAP_ELEM_SIZE = 8;
const Elem = {
NONE: 0,
BLOCK: 1,
LADDER: 2,
BAR: 3,
ROCK: 4,
}
class ENone {
can_go_through() { return true; }
can_up() { return false; }
can_stand_on() { return false; }
can_hang() { return false; }
sprite_no() { return 0; }
dig() {}
update() {}
}
class ELadder {
can_go_through() { return true; }
can_up() { return true; }
can_stand_on() { return true; }
can_hang() { return true; }
sprite_no() { return 1; }
dig() {}
update() {}
}
class EBar {
can_go_through() { return true; }
can_up() { return false; }
can_stand_on() { return false; }
can_hang() { return true; }
sprite_no() { return 3; }
dig() {}
update() {}
}
class ERock {
can_go_through() { return false; }
can_up() { return false; }
can_stand_on() { return true; }
can_hang() { return false; }
sprite_no() { return 22; }
dig() {}
update() {}
}
function createElem(id) {
switch(id) {
case Elem.NONE: return new ENone();
case Elem.BLOCK: return new EBlock();
case Elem.LADDER: return new ELadder();
case Elem.BAR: return new EBar();
case Elem.ROCK: return new ERock();
}
}
function createMap(m) {
let dat = [];
for (let i = 0; i < m.length; i++) {
dat[i] = createElem(m[i]);
}
return dat;
}
export class World {
constructor(w,h, data) {
this.w = w;
this.h = h;
this.data = createMap(data);
}
update() {
for (let o of this.data) {
o.update();
}
}
get_obj(sx,sy) {
let x = Math.floor(sx/MAP_ELEM_SIZE);
let y = Math.floor(sy/MAP_ELEM_SIZE);
return this.data[x + y*this.w];
}
canGoThrough(x,y) {
return this.get_obj(x,y).can_go_through();
}
canUp(x,y) {
return this.get_obj(x,y).can_up();
}
canStandOn(x,y) {
return this.get_obj(x,y).can_stand_on();
}
canHang(x,y) {
return this.get_obj(x,y).can_hang();
}
isOnLadder(x,y) {
return this.get_obj(x,y) instanceof ELadder;
}
isOnBar(x,y) {
return this.get_obj(x,y) instanceof EBar;
}
dig(x, y) {
this.get_obj(x,y).dig();
}
draw() {
for (let y = 0; y < this.h; y++) {
for (let x = 0; x < this.w; x++) {
let sno = this.data[x+y*this.w].sprite_no();
drawSprite(sno, x*MAP_ELEM_SIZE, y*MAP_ELEM_SIZE);
}
}
}
}Rebuilding the Map Data Management
In “How to Make Lode Runner Part 2,” the map data was defined as a one-dimensional array of numbers. We’re still using that approach, but after receiving that data in the World class, we’re converting it to an array of objects for internal management.
const map1 = [
    0,0,0,0,0,0,0,0,0,0,
    1,0,3,0,0,0,0,0,0,1,
    1,2,0,1,1,1,1,1,2,1,
    1,2,0,1,0,0,0,1,2,1,
    1,2,0,1,1,1,1,1,2,1,
    1,2,0,1,1,1,1,1,1,1,
    1,2,0,3,3,3,3,0,0,1,
    1,2,0,0,0,0,0,1,1,1,
    1,2,0,0,0,0,0,0,0,1,
    4,4,4,4,4,4,4,4,4,4,
]
The map data map1 remains a number array. We’ll manage the level data in this format, passing it to the constructor of the World object in index.js.
let map = new World(10, 10, map1);Inside the World class, the map data received from outside is converted to an array of objects internally.
export class World {
    constructor(w,h, data) {
        this.w = w;
        this.h = h;
        this.data = createMap(data);
    }
・・・
The internal object array is generated using a separate createMap() function.
function createMap(m) {
    let dat = [];
    for (let i = 0; i < m.length; i++) {
        dat[i] = createElem(m[i]);
    }
    return dat;
}
Individual objects are created with the createElem() function, which returns an object corresponding to each number.
function createElem(id) {
    switch(id) {
    case Elem.NONE: return new ENone();
    case Elem.BLOCK: return new EBlock();
    case Elem.LADDER: return new ELadder();
    case Elem.BAR: return new EBar();
    case Elem.ROCK: return new ERock();
    }
}
Design Changes for Map Management and Collision Detection
In the implementation of the previous demo, the relationship between the Chara object and the World object was as shown in the diagram below.
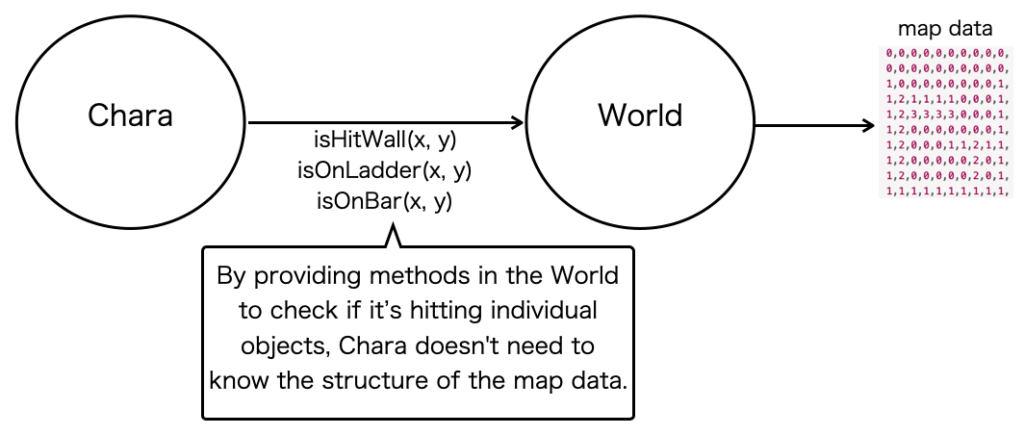
By having World hide the map data, we ensured that Chara didn’t need to change its implementation even if the data structure changed.
This time, the relationship between the Chara and World objects is as shown below.
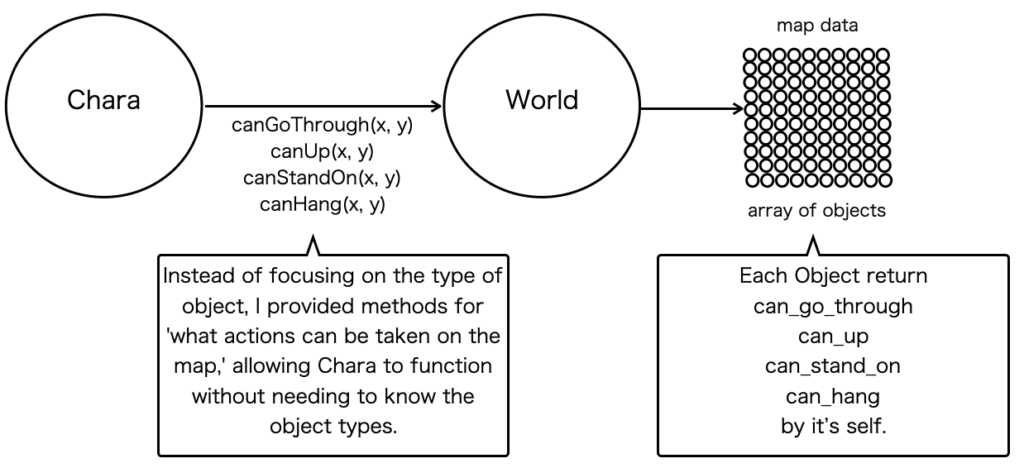
Unlike before, the map data in World is not an array of numbers but an array of objects corresponding to those numbers. Also, instead of providing methods for collision detection by object type, World offers methods like canGoThrough() that use a different approach.
When Chara moves, it needs to check the elements on the screen to decide if it can go further. In the previous implementation, it was like this:
    check_move_right() {
        if (this.map.isHitWall(this.x+this.w+1, this.y))
            return;
    ・・・
    }
World had a method called isHitWall() which was used. Chara decided its actions with “walls” in mind.
This time, we changed the implementation of check_move_right() as shown below:
    check_move_right() {
        if (!this.map.canGoThrough(this.x+this.w+1, this.y))
            return;
    ・・・
    }
isHitWall() has been replaced with canGoThrough(). As the name suggests, canGoThrough returns the result of whether you can pass through or not, not what type of object it is.
With this approach, even if new types of elements are added to the screen, there’s no need to change the implementation on the Chara side.
However, the original design also has its merits. If Chara gains some ability to “pass through walls,” it’s more straightforward to look at the object type on the Chara side.
The design of the simple object relationships changes depending on the specifications of the game you want to create. Figuring out the simplest way to build something is the most enjoyable part of programming.
Implementing Auto-Recovering Blocks
We changed the map data managed within the World class from a simple number array to an array of objects to implement auto-recovering blocks.
Auto-recovering blocks have the following four states:
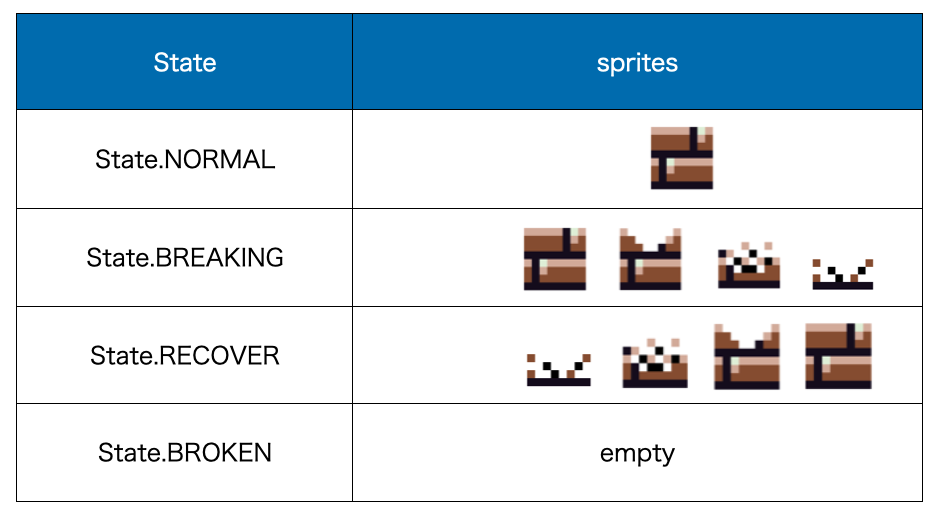
Within the Block class, we define the states and the corresponding animation table like this:
const State = {
    NORMAL: 'NORMAL',
    BREAKING: 'BREAKING',
    RECOVER: 'RECOVER',
    BROKEN: 'BROKEN',
}

const anime_table = {
    NORMAL: { frames: [16], frame_interval: 1},
    BREAKING: { frames: [17,18,19,20], frame_interval: 20 },
    RECOVER: { frames: [19,18,17], frame_interval: 60 },
    BROKEN: { frames: [20], frame_interval: 60*BLOCK_RECOVER_SEC },
};
The state transitions are as follows:
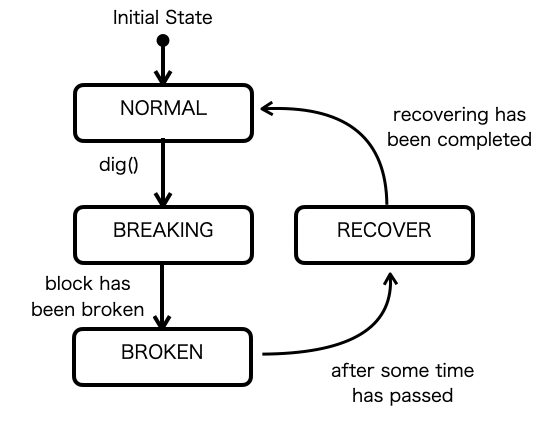
The concept is as shown above, but in the program, there’s no special judgment for “completely broken” or “recovery complete.” Only the passage of time is the condition. It proceeds to the next state after the time specified in anime_table for each frame_interval.
If there’s no user action, the block remains in the NORMAL state. When the dig() method is called, it transitions to BREAKING.
Except for NORMAL to BREAKING, the next state is fixed, so we defined it in a table like this:
const next_state_table = new Map([
    [State.NORMAL, State.NORMAL],
    [State.BREAKING, State.BROKEN],
    [State.BROKEN, State.RECOVER],
    [State.RECOVER, State.NORMAL],
]);
Block is updated at regular intervals, and within update(), it looks at this table to decide the next state.
If there’s no user action, the NORMAL state stays as NORMAL. By defining the next transition state of NORMAL as NORMAL in the table, we avoid the need to write special code to handle NORMAL.
Collision Detection with Blocks in Different States
Blocks can’t be passed through in their normal state but can be passed through when they are broken.
In a straightforward implementation, Chara.js directly checks the block state to decide whether it can pass through.
Instead, if the block itself decides whether it can be passed through, Chara doesn’t need to know the block’s state definition, as shown in the diagram below.
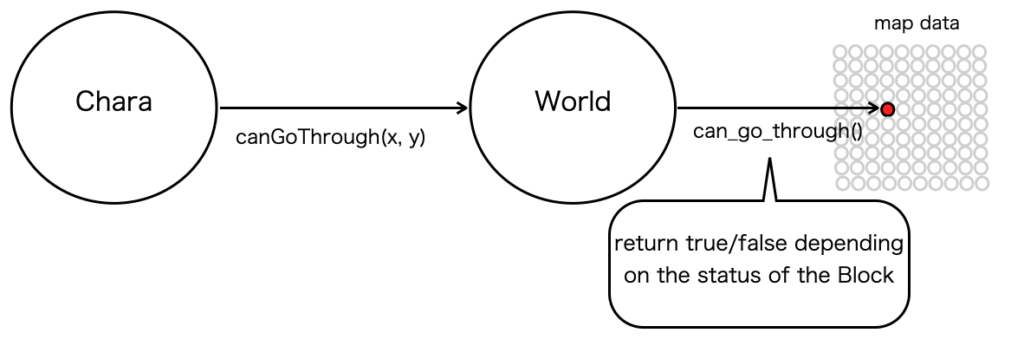
Let’s look at the implementation of Block’s can_go_through().
can_go_through() { return this.state != State.NORMAL; }It’s simply set to not allow passage if it’s not in the NORMAL state.
The advantage of this software structure is that even if the types of objects or block states increase, it doesn’t affect the implementation on the Chara side.
For example, if you add a new object like a door (locked/unlocked), Chara doesn’t even need to know that the object at the specified coordinates is a door. It just needs the result from canGoThrough(), so no change to the implementation is needed.
Next Time
We’ve implemented the “auto-recovering block,” the main gimmick of Lode Runner.
Next time, we’ll work on implementing “enemy characters,” which are an important element of the game.



コメント