This guide is for those who want to create a game using only JavaScript, without using game engines or libraries.
This is for people who:
Want to make a game but don’t know where to start.
Want to create a simple game without the hassle of using Unity or Unreal Engine.
This guide is aimed at those who already have some programming knowledge.
About This Article
The demo content is the same as the previous one, but in this article, we will explain how to create the elements on the map.
We’ll implement the screen elements like bricks, ladders, and bars, as well as the player’s movement. Try pressing the keys below.
i … Up
m … Down
j … Left
l … Right
Prerequisite Articles
For information on character states and how to manage and switch between them, please refer to the following article:
Source Code
The source code structure for this demo is as follows:
.
├── Chara.js
├── World.js
├── index.html
├── index.js
└── spritesheet.png
Here, we will explain index.js and World.js. The source code is as follows:
import { Chara } from "./Chara.js"
import { World } from "./World.js"

// background canvas
const canvas_bg = document.getElementById('canvasBg');
const context_bg = canvas_bg.getContext('2d');

// display canvas
const canvas = document.getElementById('gameCanvas');
const context = canvas.getContext('2d');
context.imageSmoothingEnabled = false;

const SPRITE_SHEET_WIDTH = 16;

const map1 = [
    0,0,0,0,0,0,0,0,0,0,
    0,0,0,0,0,0,0,0,0,0,
    1,0,0,0,0,0,0,0,0,1,
    1,2,1,1,1,1,0,0,0,1,
    1,2,3,3,3,3,0,0,0,1,
    1,2,0,0,0,0,0,0,0,1,
    1,2,0,0,0,1,1,2,1,1,
    1,2,0,0,0,0,0,2,0,1,
    1,2,0,0,0,0,0,2,0,1,
    1,1,1,1,1,1,1,1,1,1,
]


// Input event handler
document.addEventListener('keydown', keyDownHandler, false);

function keyDownHandler(event) {
    if (event.key === 'j') {
        player.move_left();
    }
    if (event.key === 'l') {
        player.move_right();
    }
    if (event.key === 'i') {
        player.move_up();
    }
    if (event.key === 'm') {
        player.move_down();
    }
}


export function drawSprite(sprite_no, x, y, flip=false) {
    let sx = (sprite_no % SPRITE_SHEET_WIDTH) *8;
    let sy = Math.floor(sprite_no / SPRITE_SHEET_WIDTH)*8;
    if (flip) {
        context_bg.save();
        context_bg.scale(-1,1);
        context_bg.drawImage(spriteSheet, sx, sy, 8, 8, -x-8, y, 8, 8);
        context_bg.restore();
    } else {
        context_bg.drawImage(spriteSheet, sx, sy, 8, 8, x, y, 8, 8);
    }
}


function update() {
    context_bg.clearRect(0, 0, canvas_bg.width, canvas_bg.height);

    for (let o of obj_list) {
        o.update();
        o.draw();
    }

    // enlarging the display
    context.clearRect(0, 0, canvas.width, canvas.height);
    context.drawImage(canvas_bg, 0, 0, canvas_bg.width, canvas_bg.height, 0, 0, canvas.width, canvas.height);
}

// load sprite sheet
const spriteSheet = new Image();
spriteSheet.src = "./spritesheet.png";

let map = new World(10, 10, map1);
let player = new Chara(8, 0, map);

let obj_list = [];
obj_list.push(map);
obj_list.push(player);


setInterval(update, 10);
import {drawSprite} from "./index.js"
const MAP_ELEM_SIZE = 8;
const Elem = {
NONE: 0,
WALL: 1,
LADDER: 2,
BAR: 3,
}
const spriteMap = new Map([
[Elem.WALL, 16],
[Elem.LADDER, 1],
[Elem.BAR, 3],
]);
export class World {
constructor(w,h, data) {
this.w = w;
this.h = h;
this.data = data;
}
update() {
}
get_obj(sx,sy) {
let x = Math.floor(sx/MAP_ELEM_SIZE);
let y = Math.floor(sy/MAP_ELEM_SIZE);
return this.data[x + y*this.w];
}
isHitWall(sx, sy) {
return this.get_obj(sx,sy) == Elem.WALL;
}
isOnLadder(sx, sy) {
return this.get_obj(sx,sy) == Elem.LADDER;
}
isOnBar(sx, sy) {
return this.get_obj(sx,sy) == Elem.BAR;
}
sprite_no(id) {
return spriteMap.get(id) || 0;
}
draw() {
for (let y = 0; y < this.h; y++) {
for (let x = 0; x < this.w; x++) {
let id = this.data[x+y*this.w];
let sp_no = this.sprite_no(id);
drawSprite(sp_no, x*MAP_ELEM_SIZE, y*MAP_ELEM_SIZE);
}
}
}
}Managing and Drawing Map Data
Map data is defined in index.js, but the management and drawing of the data during the game are handled by the World class. The reason for this will be explained later.
The implementation of map data for this demo is in index.js as shown below. It consists of a 10×10 grid.
const map1 = [
    0,0,0,0,0,0,0,0,0,0,
    0,0,0,0,0,0,0,0,0,0,
    1,0,0,0,0,0,0,0,0,1,
    1,2,1,1,1,1,0,0,0,1,
    1,2,3,3,3,3,0,0,0,1,
    1,2,0,0,0,0,0,0,0,1,
    1,2,0,0,0,1,1,2,1,1,
    1,2,0,0,0,0,0,2,0,1,
    1,2,0,0,0,0,0,2,0,1,
    1,1,1,1,1,1,1,1,1,1,
]
As usual, a one-dimensional array is easier to handle, so we’re using that. The meaning of 0 and 1 is defined within World.js.
const Elem = {
    NONE: 0,
    WALL: 1,
    LADDER: 2,
    BAR: 3,
}
When drawing the map, we need to link the object numbers with the sprite numbers. This is done using the spriteMap object.
const spriteMap = new Map([
    [Elem.WALL, 16],
    [Elem.LADDER, 1],
    [Elem.BAR, 3],
]);
The Map object created with new Map() is a standard JavaScript feature. In the definition above, you can use something like spriteMap.get(Elem.WALL) to get the value.
The sprite numbers corresponding to each element (Elem) are just the order in the sprite sheet I prepared.
Drawing on the screen is done with the following function:
draw() {
    for (let y = 0; y < this.h; y++) {
        for (let x = 0; x < this.w; x++) {
            let id = this.data[x+y*this.w];
            let sp_no = this.sprite_no(id);
            drawSprite(sp_no, x*MAP_ELEM_SIZE, y*MAP_ELEM_SIZE);
        }
    }
}
MAP_ELEM_SIZE is the size of one map grid, which is 8×8 pixels. It’s the same size as the character.
Collision Detection with Objects on the Map
To determine what the character is hitting on the map, we retrieve the object at that coordinate. The following code does this:
    get_obj(sx,sy) {
        let x = Math.floor(sx/MAP_ELEM_SIZE);
        let y = Math.floor(sy/MAP_ELEM_SIZE);
        return this.data[x + y*this.w];
    }
The given sx, sy are the character’s coordinates at an 80×80 resolution. On the other hand, the map data is a 10×10 world made up of grids that are 8×8 pixels in size. We perform coordinate conversion between these.
Using the above function, you can define functions to check, for example, if you’re hitting a wall (block) as follows:
    isHitWall(sx, sy) {
        return this.get_obj(sx,sy) == Elem.WALL;
    }
When specifying coordinates for collision detection, consider the state of the character.
- Is the ground empty? (Should the character fall?)
- Is the character overlapping with a ladder? (Can it move up and down?)
- Is there a wall in the direction it’s heading? (Can it move left or right?)
For example, when moving left or right, it looks like this. The key point is to specify the coordinates of the destination.
    check_move_right() {
        // When moving to the right, check one pixel ahead of the character's area,
     // and if there's a wall, it can't move.
        if (this.map.isHitWall(this.x+this.w+1, this.y))
            return;
    ・・・
    }
    check_move_left() {
        // When moving to the left, check one pixel ahead of the character's area,
     // and if there's a wall, it can't move.
        if (this.map.isHitWall(this.x-1, this.y))
            return;
   ・・・
  }
By summarizing frequently used collision detection with easy-to-understand function names, the code becomes easier to understand.
    can_fall() {
        return ! (this.is_on_wall() || this.is_on_ladder() || this.is_over_ladder() || this.is_over_bar());
    }

    is_on_wall() {
        return this.map.isHitWall(this.x, this.y+this.h+1);
    }

    is_over_ladder() {
        return this.map.isOnLadder(this.x+this.w/2, this.y+this.h/2);
    }

    is_on_ladder() {
        return this.map.isOnLadder(this.x, this.y+this.h+1);
    }

    is_over_bar() {
        return this.map.isOnBar(this.x+this.w/2, this.y+this.h/2);
    }
Class Design and Object Relationships
To manage the map data, we intentionally created a World class. The reason is to prevent Chara from directly referencing the map data.
Chara needs to check collisions between its position and objects on the map, but all of this is done through the methods (functions) of World. Here’s a diagram:
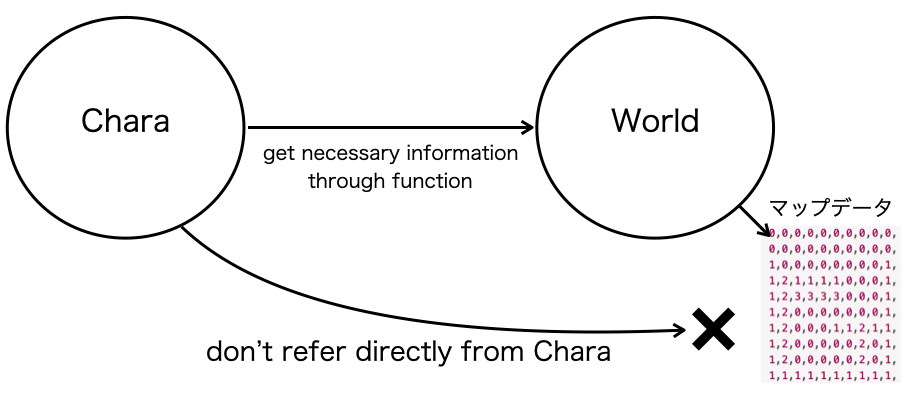
With this structure, even if the map data structure changes in the future, only the implementation of World needs to be modified, and the implementation of Chara can remain unchanged.
What’s Next
We’ve covered how to hold map data and collision detection. Including the previous article, the demo we created allows the player’s character to move freely on the screen.
Next, we will finally implement the part of the game that is the gimmick of Lode Runner: the blocks that automatically recover.



コメント