This guide is for those who want to create a game using only JavaScript, without using game engines or libraries.
This is for people who:
Want to make a game but don’t know where to start.
Want to create a simple game without the hassle of using Unity or Unreal Engine.
This guide is aimed at those who already have some programming knowledge.
What is Lode Runner?
Lode Runner is an action puzzle game that was popular in the 1980s. It was ported to the NES as well as 8-bit computers of the time. Even today, it’s been remade for the latest game consoles and I think it is a classic masterpiece.
The goal of the game is to collect all the gold bars on the stage and escape without getting caught by enemies. Once you’ve collected all the gold bars and reached the top of the stage, you’ve cleared the level.
Watching this YouTube video makes you realize that it was ported to almost every platform, including PC, consoles, arcade, and mobile.
Using Lode Runner as a Game Programming Example
In terms of difficulty, it’s a bit of a step up if you’ve already made something like Sokoban or Tetris. I think it’s just about the right size for an individual to make for fun as a hobby.
Larger games come with their own set of challenges, so you’ll need some extra motivation to overcome those (just my personal opinion, lol).
I’ve made a few Lode Runner clones in the past just to show to my friends, and the latest one looks pretty nice, so I’ll explain the process in parts by making it again.
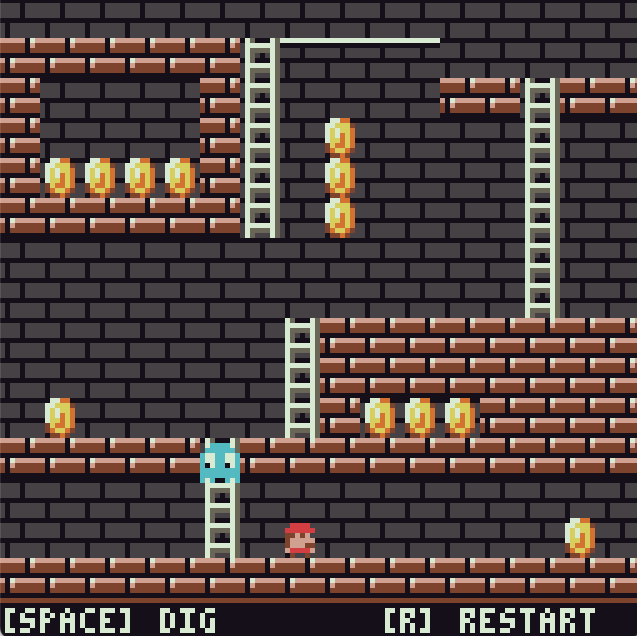
What We Will Create in This Article
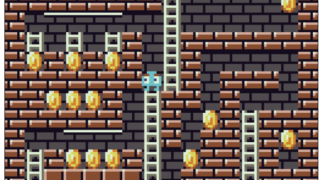
We will implement the screen elements like bricks, ladders, and bars, as well as the player’s movement.
Try pressing the keys below.
i … Move up, m … Move down, j … Move left, l … Move right
Prerequisite Articles
I’ve written separate articles on how to animate pixel art and how to link it with character state management, so I recommend reading those first.
Source Code
The source code for this demo is structured as follows:
.
├── Chara.js
├── World.js
├── index.html
├── index.js
└── spritesheet.png
In this article, we’ll explain the state management and implementation of character actions. The complete source of Chara.js is as follows:
import {drawSprite} from "./index.js"

const State = {
    STOP: 'STOP',
    MOVE_LEFT : 'MOVE_LEFT',
    MOVE_RIGHT: 'MOVE_RIGHT',
    MOVE_UP : 'MOVE_UP',
    MOVE_DOWN : 'MOVE_DOWN',
    FALL:  'FALL',
    STOP_LADDER: 'STOP_LADDER',
    MOVE_BAR_LEFT : 'MOVE_BAR_LEFT',
    MOVE_BAR_RIGHT : 'MOVE_BAR_RIGHT',
    STOP_BAR : 'STOP_BAR',
}

const anime_table =  {
    STOP: {move_count: 0, frames: [34,35], frame_interval: 60},
    MOVE_LEFT: {move_count: 8, frames: [36,37,38], frame_interval: 3},
    MOVE_RIGHT: { move_count: 8, frames: [36,37,38], frame_interval: 3},
    MOVE_UP: {move_count: 8, frames: [39,40], frame_interval: -1},
    MOVE_DOWN: {move_count: 8, frames: [39,40], frame_interval: -1},
    FALL: {move_count: 8, frames: [34,34,41,41], frame_interval: 2},
    STOP_LADDER: {move_count: 8, frames: [39,40], frame_interval: -1},
    MOVE_BAR_LEFT: {move_count: 8, frames: [32,33], frame_interval: -1},
    MOVE_BAR_RIGHT: {move_count: 8, frames: [32,33], frame_interval: -1},
    STOP_BAR: {move_count: 8, frames: [32,33], frame_interval: -1},
};

const Move = {
    NONE: 0,
    STOP: 1,
    RIGHT: 2,
    LEFT: 3,
    DOWN: 4,
    UP: 5,
}

export class Chara {

    constructor(x,y, map) {
        this.x = x;
        this.y = y;
        this.w = 8;
        this.h = 8;
        this.anime_count = 0;
        this.anime_index = 0;
        this.move_count = 0;
        this.state = State.STOP;
        this.request_move = Move.STOP;
        this.flip = false;
        this.anime_table = anime_table;
        this.map = map;
    }

    update() {
        let action_func = `action_${this.state.toLowerCase()}`;

        if (!this[action_func]()) {
            if (this.can_fall()) {
                this.change_state(State.FALL);
            } else {
                switch(this.request_move) {
                case Move.STOP: this.check_move_stop(); break;
                case Move.RIGHT: this.check_move_right(); break;
                case Move.LEFT: this.check_move_left(); break;
                case Move.UP: this.check_move_up(); break;
                case Move.DOWN: this.check_move_down(); break;
                }
                this.request_move = Move.STOP;
            }
        }

        this.anime_update();
    }

    check_move_stop() {
        if (this.is_over_ladder()) {
            this.change_state(State.STOP_LADDER);
        } else if (this.is_over_bar()) {
            this.change_state(State.STOP_BAR);
        } else {
            this.change_state(State.STOP);
        }
    }

    check_move_right() {
        if (this.map.isHitWall(this.x+this.w+1, this.y))
            return;
        if (this.can_fall())
            return

        if (this.map.isOnBar(this.x+this.w+1, this.y)) {
            this.change_state(State.MOVE_BAR_RIGHT);
            this.anime_update(true);
        } else {
            this.change_state(State.MOVE_RIGHT);
        }
        this.flip = false;
    }

    check_move_left() {
        if (this.map.isHitWall(this.x-1, this.y))
            return;
        if (this.can_fall())
            return

        if (this.map.isOnBar(this.x-1, this.y)) {
            this.change_state(State.MOVE_BAR_LEFT);
            this.anime_update(true);
        } else {
            this.change_state(State.MOVE_LEFT);
        }
        this.flip = true;
    }

    check_move_up() {
        if (!this.is_over_ladder())
            return

        this.change_state(State.MOVE_UP);
        this.anime_update(true);
    }

    check_move_down() {
        if (this.is_on_wall())
            return;
        if (!this.is_on_ladder() && !this.is_over_ladder() && !this.is_over_bar())
            return;
        this.change_state(State.MOVE_DOWN);
        this.anime_update(true);
    }

    action_stop() {
    }

    action_move_left() {
        return this.count_move(-1, 0);
    }

    action_move_right() {
        return this.count_move(1, 0);
    }

    action_move_up() {
        return this.count_move(0, -1);
    }

    action_move_down() {
        return this.count_move(0, 1);
    }

    action_stop_ladder() {
        this.action_stop();
    }

    action_fall() {
        return this.count_move(0, 1);
    }

    action_move_bar_right() {
        return this.count_move(1, 0);
    }

    action_move_bar_left() {
        return this.count_move(-1, 0);
    }

    action_stop_bar() {
        return this.action_stop();
    }


    anime_update(force=false) {
        let frames = this.anime_table[this.state].frames;
        let frame_interval = this.anime_table[this.state].frame_interval;

        if (force) {
            this.anime_index++;
        } else if (frame_interval == -1) {
        } else if (this.anime_count >= frame_interval) {
            this.anime_index++;
            this.anime_count = 0;
        }

        if (this.anime_index >= frames.length)
            this.anime_index = 0;

        this.sprite = frames[this.anime_index];
        this.anime_count++;
    }

    draw() {
        drawSprite(this.sprite, this.x, this.y, this.flip);
    }

    change_state(state) {
        this.state = state;
        this.move_count = this.anime_table[this.state].move_count;

        if (this.state != state) {
            this.anime_index = 0;
            this.anime_count = 0;
        }
    }

    count_move(dx, dy) {
        this.move_count--;
        if (this.move_count < 0) {
            return false;
        }
        this.x += dx;
        this.y += dy;
        return true;
    }

    stop_move() {
        this.request_move = Move.STOP;
    }

    can_fall() {
        return ! (this.is_on_wall() || this.is_on_ladder() || this.is_over_ladder() || this.is_over_bar());
    }

    is_on_wall() {
        return this.map.isHitWall(this.x, this.y+this.h+1);
    }

    is_over_ladder() {
        return this.map.isOnLadder(this.x+this.w/2, this.y+this.h/2);
    }

    is_on_ladder() {
        return this.map.isOnLadder(this.x, this.y+this.h+1);
    }

    is_over_bar() {
        return this.map.isOnBar(this.x+this.w/2, this.y+this.h/2);
    }


    move_right() {
        this.request_move = Move.RIGHT;
    }

    move_left() {
        this.request_move = Move.LEFT;
    }

    move_up() {
        this.request_move = Move.UP;
    }

    move_down() {
        this.request_move = Move.DOWN;
    }

}
Character State
For this demo, the states we need are as follows:
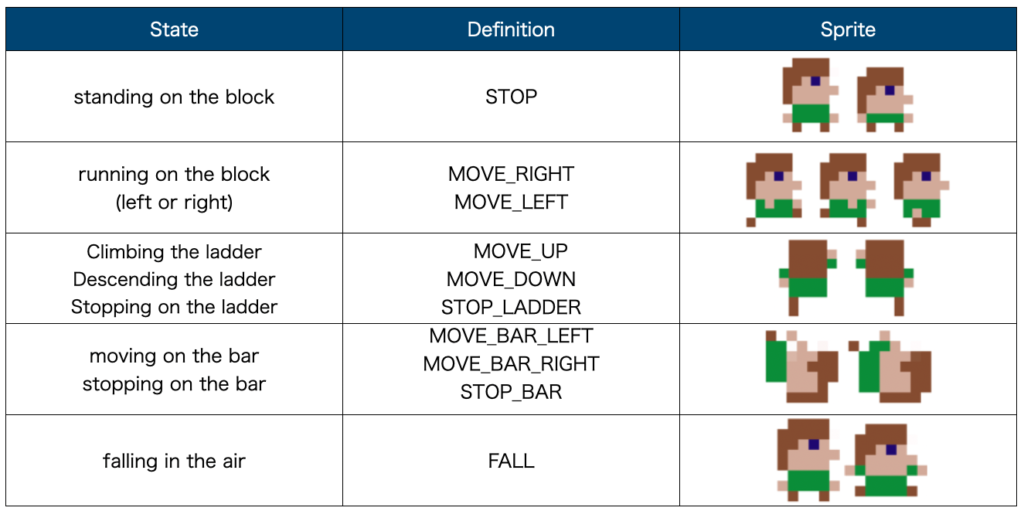
We’ll only provide right-facing sprites. When the character moves left, we’ll flip the image for rendering.
The code for defining the states and implementing the animation information table is as follows:
const State = {
    STOP: 'STOP',
    MOVE_LEFT : 'MOVE_LEFT',
    MOVE_RIGHT: 'MOVE_RIGHT',
    MOVE_UP : 'MOVE_UP',
    MOVE_DOWN : 'MOVE_DOWN',
    FALL:  'FALL',
    STOP_LADDER: 'STOP_LADDER',
    MOVE_BAR_LEFT : 'MOVE_BAR_LEFT',
    MOVE_BAR_RIGHT : 'MOVE_BAR_RIGHT',
    STOP_BAR : 'STOP_BAR',
}

const anime_table =  {
    STOP: {move_count: 120, frames: [34,35], frame_interval: 60},
    MOVE_LEFT: {move_count: 8, frames: [36,37,38], frame_interval: 3},
    MOVE_RIGHT: { move_count: 8, frames: [36,37,38], frame_interval: 3},
    MOVE_UP: {move_count: 8, frames: [39,40], frame_interval: -1},
    MOVE_DOWN: {move_count: 8, frames: [39,40], frame_interval: -1},
    FALL: {move_count: 8, frames: [34,34,41,41], frame_interval: 2},
    STOP_LADDER: {move_count: 8, frames: [39,40], frame_interval: -1},
    MOVE_BAR_LEFT: {move_count: 8, frames: [32,33], frame_interval: -1},
    MOVE_BAR_RIGHT: {move_count: 8, frames: [32,33], frame_interval: -1},
    STOP_BAR: {move_count: 8, frames: [32,33], frame_interval: -1},
};
In State, each state is defined as a string.
The anime_table object uses the strings defined in State as keys, with corresponding values being the animation information objects for each state. Since the information in anime_table can be retrieved using the keys, there’s no need to worry about the order of definitions.
Here’s how to extract the information easily:
        let frames = this.anime_table[this.state].frames;
        let frame_interval = this.anime_table[this.state].frame_interval;
State Transition Sequence
The sequence of processing when transitioning from one state to another is as follows:
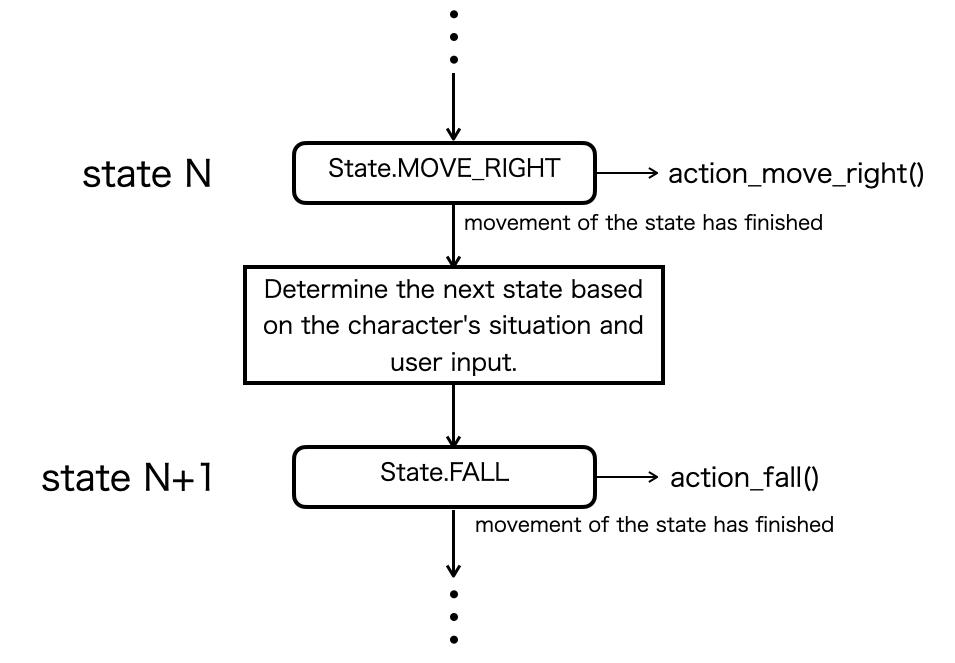
Determine the next state based on the character’s situation and user input.
Specifically, process the following:
- Is the character in a falling state?
- If it’s in a falling state, change to the falling state.
- If not, check the user’s input (up, down, left, right buttons) to decide the next action.
- Check if it can move in each direction.
- If it can move in any direction, change the state.
Here’s the implementation:
    update() {
        let action_func = `action_${this.state.toLowerCase()}`;

        if (!this[action_func]()) {
        // 状態の動作が終了した
            if (this.can_fall()) {
                this.change_state(State.FALL);
            } else {
                switch(this.request_move) {
                case Move.STOP: this.check_move_stop(); break;
                case Move.RIGHT: this.check_move_right(); break;
                case Move.LEFT: this.check_move_left(); break;
                case Move.UP: this.check_move_up(); break;
                case Move.DOWN: this.check_move_down(); break;
                }
                this.request_move = Move.STOP;
            }
        }

        this.anime_update();
    }

    check_move_stop() {
     //omitted
    }

    check_move_right() {
     //omitted
    }

    check_move_left() {
     //omitted
    }

    check_move_up() {
     //omitted
    }

    check_move_down() {
     //omitted
    }
User Input and State Reflection
In some character states, user input is not accepted, such as when falling. Also, when standing on a block, pressing the down key doesn’t trigger a response.
In this implementation, user input is temporarily accepted as a state change request, and the request is checked when the character’s action has settled.
    move_right() {
        this.request_move = Move.RIGHT;
    }

    move_left() {
        this.request_move = Move.LEFT;
    }

    move_up() {
        this.request_move = Move.UP;
    }

    move_down() {
        this.request_move = Move.DOWN;
    }
this.request_move is actually checked in the following part of the update() function:
    update() {
・・・
                switch(this.request_move) {
                case Move.STOP: this.check_move_stop(); break;
                case Move.RIGHT: this.check_move_right(); break;
                case Move.LEFT: this.check_move_left(); break;
                case Move.UP: this.check_move_up(); break;
                case Move.DOWN: this.check_move_down(); break;
                }
                this.request_move = Move.STOP;
・・・
    }
Function Calls for Each State
When the character is in a certain state, there’s a specific action we want to perform in that state. For example, State.MOVE_RIGHT moves the character to the right, State.MOVE_UP moves it up, and State.MOVE_DOWN moves it down.
We want to call different functions for each state, and a basic implementation might look like this:
        switch(this.state) {
        case State.STOP:
            this.action_stop();
            break;
        case State.MOVE_RIGHT:
            this.action_right();
            break;
        case State.MOVE_LEFT:
            this.action_left();
            break;
        }
Alternatively, without using a switch-case statement, JavaScript allows for a more concise implementation.
Since State is defined as a string, function distribution can be achieved with the following implementation:
const State = {
    STOP: 'STOP',
    MOVE_LEFT : 'MOVE_LEFT',
    MOVE_RIGHT: 'MOVE_RIGHT',
・・・
}

・・・・
update (){
     let action_func = `action_${this.state.toLowerCase()}`;

       this[action_func]()
・・・
}
By creating the function name in the action_func variable and using this[functionName](), we execute the function as a reference to its own property.
The function name is created using the string defined in State. This part is here:
`action_${this.state.toLowerCase()}`For instance, when this.state is State.MOVE_RIGHT, its content is the string ‘MOVE_RIGHT’. Calling the toLowerCase() method on this string object converts it to lowercase, resulting in ‘move_right’.
By adding action_ to the beginning, it finally becomes ‘action_move_right’. This is the function name passed to this[...]().
Unlike the implementation using switch-case statements, this has the following disadvantages:
- You can’t freely decide the function name to call.
- You must define a function corresponding to the state defined in
State(it will cause an error during execution if not defined).
Nevertheless, in most cases, action functions are needed for each state, and if you want to define a state that does nothing, you can simply create an empty function. Overall, I think the benefits of concise implementation are greater.
What’s Next
This has gotten a bit long, so I’ll end it here for now. Next time, I’ll explain how to manage the display objects of the map and collision detection.




コメント