In This Article
In the last post, we used Capacitor to quickly get an HTML/JavaScript game running on an iPhone.
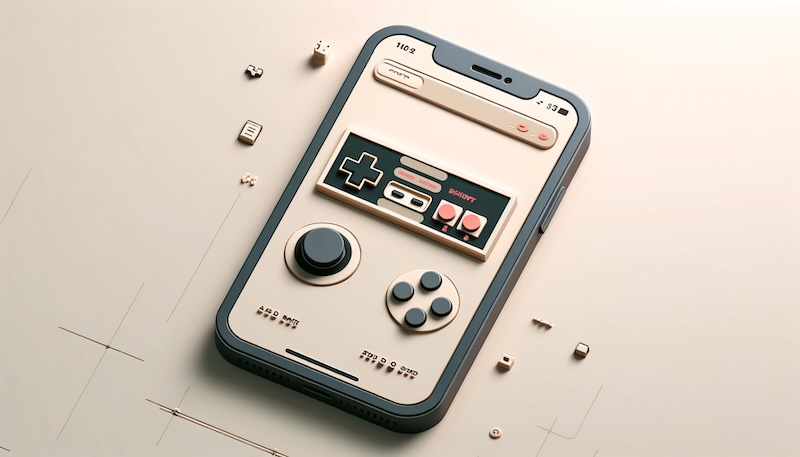
The games we’ve made on this blog so far, being retro games, only supported input from a keyboard or gamepad. However, this setup doesn’t allow for control on an iPhone. So, I wanted to create a touch-friendly GUI component to act as a gamepad, which can be placed over the game screen.
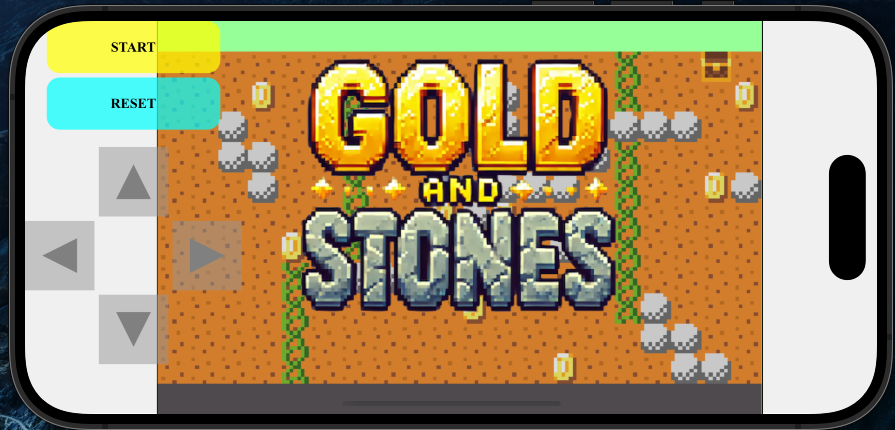
I also embedded this into WordPress, so here’s a working version. Start by pressing the yellow “START” button. You can drag and reposition the gamepad section.
Source Code
The gamepad as a GUI component is mainly built using HTML and CSS.
The original index.html file was a simple setup.
<html>
    <center>
        <canvas id="canvasBg" width="160" height="104" style="border:1px solid #000000; background-color: #9bfff0; display:none;"></canvas>
        <canvas id="gameCanvas" width="640" height="416" style="border:1px solid #000000; background-color: #97ff97;"></canvas>
    <script type="module" src="index.js"></script>
</html>
It only had two canvases: canvasBg for the drawing buffer and gameCanvas for display. The canvasBg was set to not be visible in the browser.It only had two canvases: canvasBg for the drawing buffer and gameCanvas for display. The canvasBg was set to not be visible in the browser.
Here’s what the updated index.html looks like, and you’ll also need style.css.
<html>
    <head>
        <link rel="stylesheet" href="./assets/style.css" type="text/css">
    </head>
    <body>
        <div id="gameContainer">
            <div id="controlsContainer">
                <div id="buttons">
                    <div class="button" id="buttonA" value="A">START</div>
                    <div class="button" id="buttonB" value="B">RESET</div>
                </div>
                <div id="dpad">
                    <div class="dpad-button" id="dpad-up" value="up">
                        <svg width="50" height="50" xmlns="http://www.w3.org/2000/svg">
                            <polygon points="25,5 45,45 5,45" fill="gray" /></svg
                        >
                    </div>
                    <div class="dpad-button" id="dpad-left" value="left">
                        <svg width="50" height="50" xmlns="http://www.w3.org/2000/svg">
                            <polygon points="5,25 45,5 45,45" fill="gray" /></svg
                        >
                    </div>
                    <div class="dpad-button" id="dpad-right" value="right">
                        <svg width="50" height="50" xmlns="http://www.w3.org/2000/svg">
                            <polygon points="45,25 5,5 5,45" fill="gray" /></svg
                        >
                    </div>
                    <div class="dpad-button" id="dpad-down" value="down">
                        <svg width="50" height="50" xmlns="http://www.w3.org/2000/svg">
                            <polygon points="25,45 5,5 45,5" fill="gray" />
                        </svg>
                    </div>
                </div>
            </div>
            <div id="canvasContainer">
                <canvas id="gameCanvas" style="border:1px solid #000000; background-color: #97ff97;"></canvas>
            </div>
        </div>

        <canvas id="canvasBg" width="160" height="104" style="border:1px solid #000000; background-color: #9bfff0; display:none;"></canvas>

        <script type="module" src="index.js"></script>

        <script>
            // Disable touch events outside buttons
            document.body.addEventListener('touchstart', function(event) {
                if (!event.target.closest('.dpad-button') && !event.target.closest('.button')) {
                    event.preventDefault();
                }
            }, { passive: false });

            // Make controls draggable
            let isDragging = false;
            let offsetX, offsetY;

            controlsContainer.addEventListener('touchstart', (e) => {
                isDragging = true;
                const touch = e.touches[0];
                offsetX = touch.clientX - controlsContainer.getBoundingClientRect().left;
                offsetY = touch.clientY - controlsContainer.getBoundingClientRect().top;
                controlsContainer.style.cursor = 'grabbing';
            });

            window.addEventListener('touchmove', (e) => {
                if (isDragging) {
                    const touch = e.touches[0];
                    controlsContainer.style.left = `${touch.clientX - offsetX}px`;
                    controlsContainer.style.top = `${touch.clientY - offsetY}px`;
                }
            });

            window.addEventListener('touchend', () => {
                if (isDragging) {
                    isDragging = false;
                    controlsContainer.style.cursor = 'grab';
                }
            });

            controlsContainer.addEventListener('mousedown', (e) => {
                isDragging = true;
                offsetX = e.clientX - controlsContainer.getBoundingClientRect().left;
                offsetY = e.clientY - controlsContainer.getBoundingClientRect().top;
                controlsContainer.style.cursor = 'grabbing';
            });

            window.addEventListener('mousemove', (e) => {
                if (isDragging) {
                    controlsContainer.style.left = `${e.clientX - offsetX}px`;
                    controlsContainer.style.top = `${e.clientY - offsetY}px`;
                }
            });

            window.addEventListener('mouseup', () => {
                if (isDragging) {
                    isDragging = false;
                    controlsContainer.style.cursor = 'grab';
                }
            });

        </script>
    </body>
</html>
body, html {
margin: 0;
padding: 0;
width: 100%;
height: 100%;
overflow: hidden;
}
#gameContainer {
display: flex;
width: 100%;
height: 100%;
background-color: #f0f0f0;
}
#controlsContainer {
position: absolute;
display: flex;
flex-direction: column;
align-items: center;
justify-content: column;
width: 250px;
height: 400px;
gap: 20px;
cursor: grab;
background-color: rgba(255,255,255,0.08)
}
#dpad {
width: 250px;
height: 150px;
display: grid;
grid-template-columns: repeat(3, 1fr);
grid-template-rows: repeat(3, 1fr);
gap: 5px;
}
.dpad-button {
width: 80px;
height: 80px;
display: flex;
justify-content: center;
align-items: center;
background-color: rgba(150, 150, 150, 0.5);
user-select: none;
}
#dpad-up { grid-column: 2; grid-row: 1; }
#dpad-left { grid-column: 1; grid-row: 2; }
#dpad-right { grid-column: 3; grid-row: 2; }
#dpad-down { grid-column: 2; grid-row: 3; }
#buttons {
width: 200px;
display: grid;
flex-direction: column;
justify-content: center;
gap: 5px;
}
.button {
width: 200px;
height: 60px;
border-radius: 15px;
display: flex;
justify-content: center;
align-items: center;
font-weight: bold;
color: black;
user-select: none;
}
#buttonA { background-color: rgba(255, 255, 0, 0.7); }
#buttonB { background-color: rgba(0, 255, 255, 0.7); }
#canvasContainer {
margin-left: 20px;
flex-grow: 1;
display: flex;
justify-content: center;
align-items: center;
}
#gameCanvas {
background-color: #fff;
max-width: 100%;
max-height: 100%;
}Structure of Elements on the Scree
Although the amount of code increased, the overall structure is not that complex. The HTML elements, described using <…> and <…/> tags, form a hierarchy of items, as shown in the diagram below.
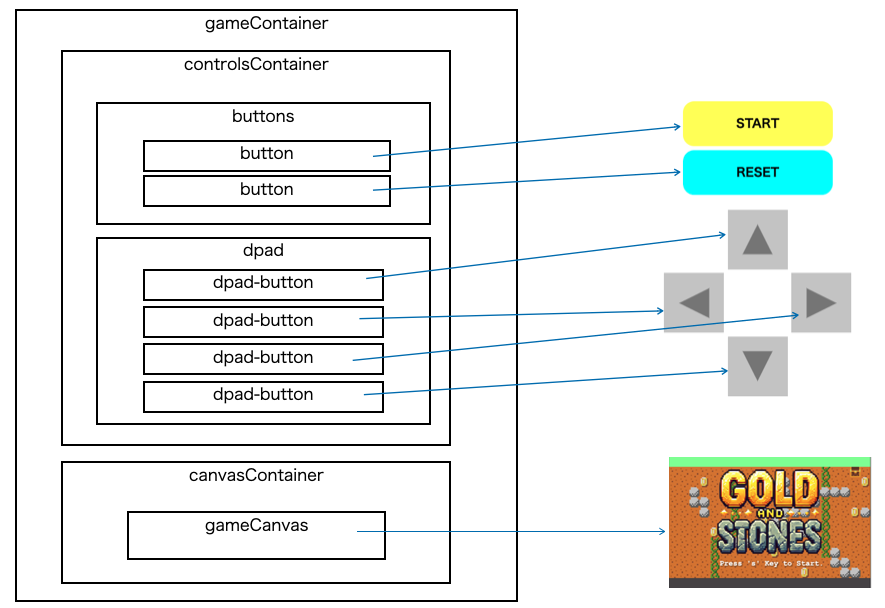
The size, shape, and color of each element are defined in style.css.
The START, RESET, and direction buttons (up, down, left, right) are placed on top of an invisible component called controlsContainer. As you can see from the CSS definition below, its size is 250x400px, and the background color is white, but its alpha channel is set to 0.08, making it almost transparent.
#controlsContainer {
    position: absolute;
    display: flex;
    flex-direction: column;
    align-items: center;
    justify-content: column;
    width: 250px;
    height: 400px;
    gap: 20px;
    cursor: grab;
    background-color: rgba(255,255,255,0.08) Almost transparent
}
This area can be dragged and repositioned using touch or mouse.
How to Drag and Move the Gamepad
To achieve this, we retrieve the coordinate data from mouse or touch events and move the controlsContainer, which holds the START/RESET and direction buttons.
Here’s a snippet of the touch event handling code:
controlsContainer.addEventListener('touchstart', (e) => {
  Handling when controlContainer is touched
});

window.addEventListener('touchmove', (e) => {
  Handling when moving while touching
  Adjust the position of controlContainer based on the touch location
  Get event from the window because the touch location may be outside of controlContainer
});

window.addEventListener('touchend', () => {
  Handling when the touch is released
  Get event from the window because the touch location may be outside of controlContainer
});
Although you can addEventListener of touchmove and touchend directly to controlsContainer, strange behavior occurs if the cursor or finger moves out of the container too quickly.
The process of dragging the controlsContainer works by adjusting its coordinates. The logic is illustrated in the diagram below.
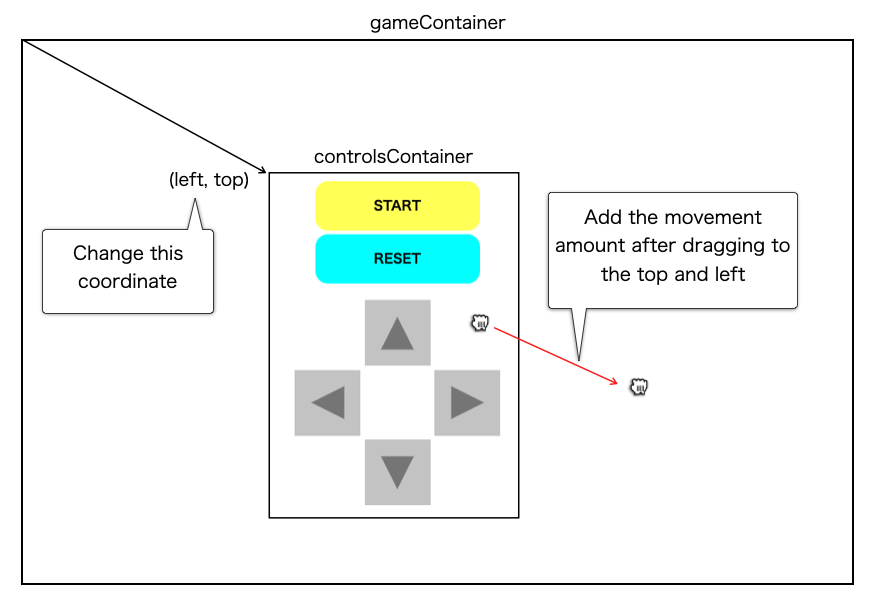
When dragging, the new coordinates are calculated as:
new_left = x2 - x1 + left
             = x2 - (x1 - left)  → x1 - left is calculated as offset during touchstart

new_top = y2 - y1 + top
             = y2 - (y1 - top)  → y1 - top is also calculated as offset during touchstart
(x1, y1) is the position of touchstart, (x2, y2) is the last position of touchmove.
Here is the actual implementation:
            controlsContainer.addEventListener('touchstart', (e) => {
                isDragging = true;
                const touch = e.touches[0];
                offsetX = touch.clientX - controlsContainer.getBoundingClientRect().left;
                offsetY = touch.clientY - controlsContainer.getBoundingClientRect().top;
                controlsContainer.style.cursor = 'grabbing';
            });

            window.addEventListener('touchmove', (e) => {
                if (isDragging) {
                    const touch = e.touches[0];
                    controlsContainer.style.left = `${touch.clientX - offsetX}px`;
                    controlsContainer.style.top = `${touch.clientY - offsetY}px`;
                }
            });
Summary
To make it easier to control retro games on the iPhone, we created a software gamepad. By using standard HTML/CSS features, I was able to achieve the desired result. While working on this, I realized the vast potential of HTML/CSS.
There are many frameworks built on these fundamental technologies. For more complex applications or GUIs, using a framework would be wise, but for simpler GUIs, standard HTML/CSS might be sufficient.
