Let’s create a game using HTML and JavaScript, without relying on game engines or libraries.
This guild is for people who:
Want to make a game but don’t know where to start.
Want to create a simple game without using complex engine like Unity or Unreal Engine.
It’s aimed at those who with some programming knowledge.
Demo Of The Template
We’ll be creating a jump-action game like Mario Bros., and to make things easier for future projects, we’ll prepare a template so you can start quickly when making similar games.
Here’s the demo I’ve prepared: The character runs left and right across the field and jumps smoothly.
j … Move Left, l … Move Right, c … Jump
You also can control it by using a gamepad.
Source Code
The file structure of the source code looks like this:
.
├── Chara.js
├── SpriteSheet.js
├── UserInput.js
├── World.js
├── assets
│   ├── chara_spritesheet.png
│   ├── stages.json
│   ├── style.css
│   └── tilesheet.png
├── index.html
└── index.js
Articles to Read First
For details on how to animate and move pixel art characters, please check out the following articles.
What This Articles Covers
In this article, I’II explain the following key points of this game template.
- Using multiple sprite sheets
- How to implement the jump action
Using Multiple Sprite Sheets
In previous games, I used only 8×8 pixel characters, and the map data (background) was also built with 8×8 tiles. Since there were few animation patterns, a single sprite sheet was enough to handle everything, including background tiles.
However, this game is based on Mario Bros., so the pixel art characters are 16×24 and 16×16, while the background tiles remain 8×8. Since there are more animation patterns for the characters, it’s easier to manage if each character has its own sprite sheet.
I’ve already set this up in a previous article where I explained how SpriteSheet.js works.
For this game template, I’ve prepared two sprite sheets: one for character animations and one for background elements like blocks.
├── assets
│   ├── chara_spritesheet.png
│   └── tilesheet.png
To load these sprite sheets in JavaScript, we do the following.
const CHARA_WIDTH = 16;
const CHARA_HEIGHT = 24;
・・・
const spsheet = new SpriteSheet(CHARA_WIDTH, CHARA_HEIGHT, "./assets/chara_spritesheet.png");
const spsheet = new SpriteSheet(8, 8, "./assets/tilesheet.png");The sprite sheet is used when rendering characters. Here’s how it’s done in Chara.js:
    draw() {
        drawSprite(spsheet, this.sprite, this.x, this.y, this.flip);
    }
drawSprite() is defined in index.js. The change here is that you can now pass the sprite sheet (spsheet) as the first argument. Rendering a sprite requires context information from the document, and this is managed in index.js.
drawSprite() is defined as follows:
export function drawSprite(spsheet, sprite_no, x, y, flip) {
    spsheet.drawSprite(context_bg, sprite_no, x, y, flip);
}
Jump Action Implementation
The key feature of this template is the character’s jump action. For the jump to work, ground collision detection is crucial. Also, the character’s animation needs to switch while jumping.
Here are the relevant parameters:
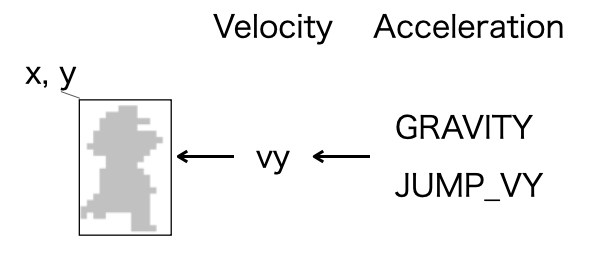
Accleration due to falling
Characters are always under the effect of gravity. This is simulated and not actual physics. We apply a constant downward acceleration to the character.
The important design points are as follows:
- The Chara object has parameters for its position (x, y) and movement speed (vx, vy).
- Acceleration due to falling is handled by the World class, not within the character itself.
Here’s how it’s implemented in the World class inside World.js:
・・・
const GRAVITY = 0.2;
・・・
    do_fall(o) {
     ・・・
        o.vy += GRAVITY;
        o.y = Math.round(o.y+o.vy);
    }

    update() {
     ・・・
        this.do_fall(this.player);
     ・・・・
    }
The update() function of the World class is called at regular intervals. During each interval, the do_fall() function is called, which adds the object’s vy (velocity) to the y-coordinate, making the object fall. In this process, by adding the constant GRAVITY to vy in every cycle, the falling speed accelerates gradually.
The acceleration is set to GRAVITY = 0.2, and this value was chosen after seeing it in action. Feel free to adjust it to your liking when making your game.
With only downward acceleration, the character would fall right off the screen, so we place blocks to prevent that. When the character can’t fall any further, we set vy = 0 to stop it from falling. The first half of the do_fall() function handles this.
    can_not_go_through(o, dy) {
        return !this.canGoThrough(o.x+2, o.y + dy) || !this.canGoThrough(o.x+o.w-2, o.y + dy);
    }

    do_fall(o) {
        if (o.vy == 0 && this.can_not_go_through(o, o.h)) {
            return;
        }
        if (o.vy > 0 && this.can_not_go_through(o, o.h + o.vy)) {
            o.vy = 0;
            return;
        }
     ・・・
    }
Jump action implemented by upward acceleration
As mentioned earlier, the character is always affected by downward acceleration. Jumping is simple: we just apply upward acceleration.
Here’s how It’s done in Chara.js:
const JUMP_VY = -5;
・・・
    do_jump() {
    ・・・
        this.vy = JUMP_VY;
        this.change_state(State.JUMP);
    }
The constant value of JUMP_VY represents the upward acceleration. I set it to -5, and this value was chosen after observing its effect in action, just like the value for GRAVITY.
While GRAVITY is handled outside of the Chara object, JUMP_VY is processed within it. This is because GRAVITY applies equally to all objects in the game, but JUMP_VY might vary for different characters.
Change the state to jump movement
The flow of jump processing and state changes is shown below:
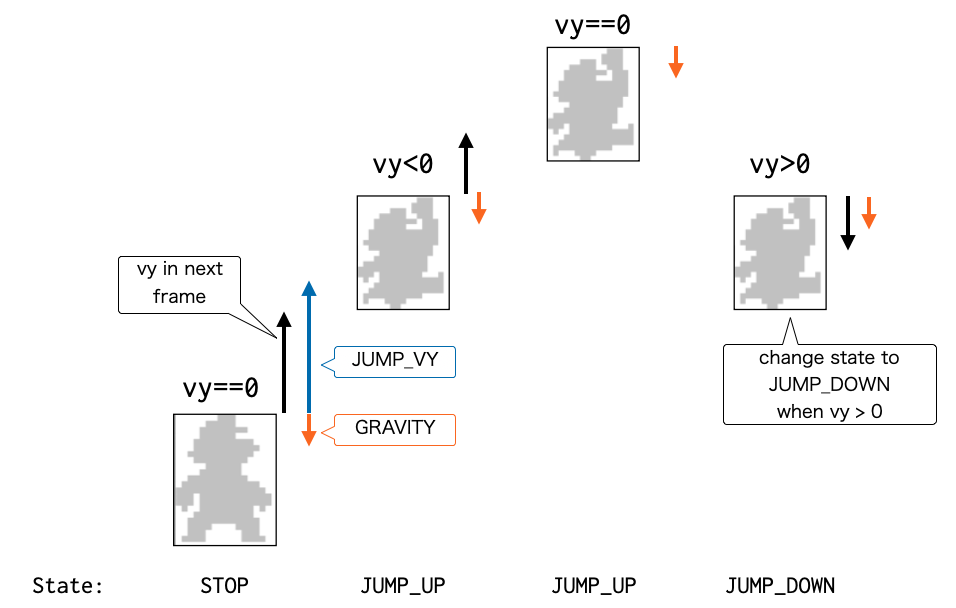
The jump is triggered by pressing the ‘c’ key (A button in this demo). When the ‘c’ key is pressed, vy is set to JUMP_VY, and the state switches to JUMP_UP.
Since JUMP_VY is -5, in the next frame, the character moves upwards by -5 + 0.2. As the frames progress, vy is gradually increased by +0.2, so the upward speed slows down.
When vy becomes greater than 0, the character is falling, and the state changes to JUMP_DOWN. When vy = 0 during the JUMP_DOWN state, the state changes to STOP.
You can’t just judge the landing with JUMP_UP alone because there’s a moment when vy = 0 at the jump’s peak, which would cause the character to briefly enter the STOP state while still in mid-air.
Again, this demo is just one example. You don’t have to follow it exactly. Use it as a reference and implement it in a way that makes sense to you.
Wrapping up
So, in this article, I’ve provided a template (with a working demo) for making a jump-action game like Mario Bros..
The main takeaways are:
- I’ve set things up so that you can use multiple sprite sheets. This makes it easier to manage data without having to match character sizes to tile sizes.
- I’ve implemented the jump action, which is both simple to understand and makes the character’s movement feel very Mario-like.
Next time, I plan to expand the character’s movements and add one of Mario’s key gameplay mechanics: platforms that rise up from below.
