Let’s create a game using HTML and JavaScript, without relying on game engines or libraries.
This guild is for people who:
Want to make a game but don’t know where to start.
Want to create a simple game without using complex engine like Unity or Unreal Engine.
It’s aimed at those who with some programming knowledge.
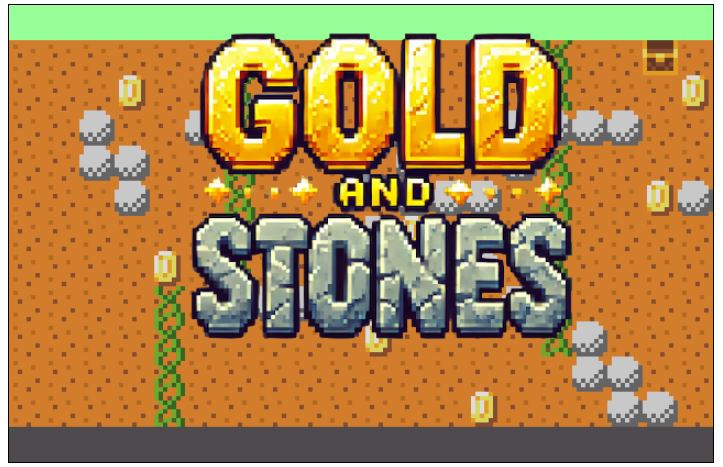
What kind of Game Will We Create?
You can check out the actual game from the link below. Try it out!
Source Code
Here’s the structure of the source code.
.
├── Chara.js
├── GObject.js
├── Rock.js
├── SpriteSheet.js
├── UserInput.js
├── World.js
├── assets
│   ├── spritesheet.png
│   ├── stages.json
│   └── title.png
├── index.html
└── index.js
SpriteSheet.js manage the sprite sheet.
UserInput.js is for handling input event uniformly from both the keyboad and gamepad.
For details on those two files, check out the article linked below.
Check out the articles linked below for understanding how to implement pixel character animation on game.
What This Article Covers
In this article, we’ll cover the following implementations:
- Managing main game data (map data, falling rocks, and the player).
- How to “dig tunnels.”
- How to make rocks fall.
- Screen transition animations.
Managing Main Game Data
Map Data
The game map consists of a 20×13 grid. Following figure shows all of elements on the map.
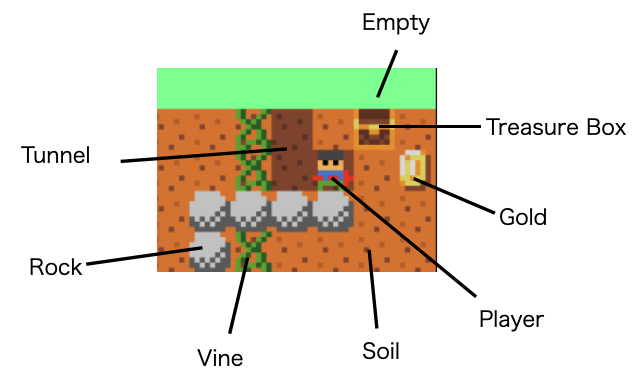
The map’s elements are defined in a JSON file to make it easy to add more stages later. The map data is stored as a one-dimensional array, representing a 20×13 grid.
The JSON file’s "data" section defines the elements.
{
    "maps": [
        {
            "w": 20,
            "h": 13,
            "data":
[0, 0, 0, 0, 0, 0, 0, 0, 0, 0, 0, 0, 0, 0, 0, 9, 0, 0, 0, 0, 2, 2, 2, 2, 2, 2, 2, 2, 2, 2, 2, 2, 2, 2, 2, 4, 2, 2, 7, 2, 2, 2, 2, 5, 2, 2, 4, 2, 2, 2, 2, 3, 2, 2, 2, 4, 2, 2, 2, 5, 2, 2, 3, 2, 2, 3, 4, 2, 2, 2, 2, 3, 2, 2, 3, 3, 3, 3, 2, 2, 2, 2, 3, 3, 2, 2, 4, 2, 2, 2, 2, 3, 2, 2, 3, 4, 2, 2, 2, 2, 2, 2, 2, 3, 2, 2, 4, 2, 2, 2, 2, 3, 3, 3, 2, 4, 2, 2, 5, 3, 2, 2, 2, 2, 2, 2, 4, 2, 2, 5, 3, 5, 2, 2, 2, 4, 2, 2, 2, 2, 2, 2, 2, 2, 5, 2, 4, 2, 2, 3, 3, 2, 2, 3, 2, 4, 2, 2, 2, 2, 2, 2, 2, 2, 4, 2, 3, 3, 3, 2, 3, 2, 2, 2, 3, 4, 2, 2, 2, 2, 2, 2, 2, 2, 4, 2, 2, 2, 2, 2, 5, 2, 2, 2, 2, 4, 3, 2, 2, 2, 2, 2, 2, 2, 4, 2, 2, 2, 2, 2, 2, 2, 2, 2, 2, 2, 3, 3, 2, 2, 2, 2, 2, 2, 4, 2, 2, 2, 2, 2, 2, 2, 2, 5, 2, 2, 2, 3, 3, 2, 1, 1, 1, 1, 1, 1, 1, 1, 1, 1, 1, 1, 1, 1, 1, 1, 1, 1, 1, 1]
        }
    ]
}
The meaning of the numbers in "data" is set in World.js.
const Elem = {
    NONE: 0,
    BLOCK: 1,
    SOIL: 2,
    ROCK: 3,
    VINE: 4,
    GOLD: 5,
    HOLE: 6,
    GOAL: 7,
    PLAYER: 9,
}
The JSON file is loaded in index.js, and the "maps" information is stored as a JavaScript object. The map data for a single stage is passed when creating an instance of the World class.
・・・
// load stage data
const res = await fetch("./assets/stages.json");
if (res.ok) {
    const data = await res.json();
    stages = data.maps;
}
・・・
        world = new World(SCREEN_W, SCREEN_H, stages[0].data);
・・・
World.js then converts this data into the format it manages internally.
The player moves around the map and needs to know what’s at each position. To keep things simple, we divide the elements into “movable” and “immovable” objects.
| Empty, Soil, Vine、Treasure Box, Gold, Hole(Tunnel) | immovable | Managed as an array of objects (a one-dimensional array expanded from 20×13). |
| Rock | movable | Managed as a list of objects that hold coordinate information. |
Even for a simple game like this one, there are various ways to manage the map data. I would like to try other methods and compare them on another occasion.
In the implementation, this.map, this.player, and this.rock_list in the World class manage this data.
・・・
export class World {
    constructor(w,h, data) {
     ・・・
        this.map = createMap(data);
     ・・・
        this.rock_list = this.createRock(w,h,data);
     ・・・
    }
・・・
Definition of Immovable Elements
The immovable objects are defined as objects with properties like this:
const ENone = {
    can_go_through: true,
    can_up: false,
    can_stand_on: false,
    can_pick_up: false,
    can_dig: false,
    sprite_no: Elem.NONE,
}
Other elements include ESoil, EBlock, EVine, EGold, EHole, and EGoal. These objects define the actions the player can take.
Movable Element:Player and Rock
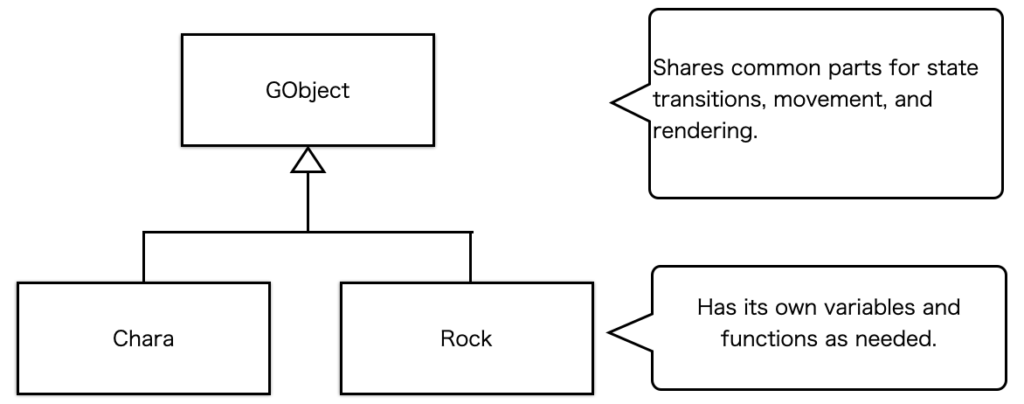
The player character moves around the stage, and similarly, rocks will fall when a tunnel is dug beneath them. They both have coordinates and will change position, which gives them a commonality.
The player is defined in the Chara class within the Chara.js file, while rocks are defined in the Rock class within the Rock.js file. The shared functionalities of these two classes have been extracted into a parent class called GObjec
How to Dig Tunnels
The player can dig through the soil, leaving behind a tunnel. Elements like soil and tunnel are defined as ESoil and EHole objects.
・・・
const ESoil = {
    can_go_through: true,
    can_up: false,
    can_stand_on: true,
    can_pick_up: false,
    can_dig: true,
    sprite_no: Elem.SOIL,
}
・・・
const EHole = {
    can_go_through: true,
    can_up: false,
    can_stand_on: false,
    can_pick_up: false,
    can_dig: false,
    sprite_no: Elem.HOLE,
}
Digging a tunnel is super simple: just replace the object at the player’s coordinates. Here’s the function from the World class:
    dig(x,y) {
        const p = map_pos({x,y});
        this.map[p.x + p.y*this.w] = EHole;
    }
Before calling this function, the game checks if the player can dig at the target location.
Making Rocks Fall
Rocks are managed separately from other elements on the map. Their initial placement is determined by the map data from the JSON file. The coordinates of rocks are extracted in the constructor of the World class, and Rock objects are created.
The this.rock_list array stores these Rock objects.
export class World {
    constructor(w,h, data) {
     ・・・
        this.rock_list = this.createRock(w,h,data);
     ・・・
    }
・・・
    createRock(w,h,data) {
        let list = [];
        for (let y = 0; y < h; y++) {
            for (let x = 0; x < w; x++) {
                if (data[x + y*w] == Elem.ROCK)
                    list.push(Rock.create(x*MAP_ELEM_SIZE, y*MAP_ELEM_SIZE, this));
            }
        }
        return list;
    }
・・・
The game world updates every 30 milliseconds, calling the update() function in World.js. In this function, the update() of each Rock object in rock_list is called.
    can_fall() {
        if (this.world.canStandOn(this.x, this.y+this.h+1))
            return false;
        return true;
    }
Each Rock object checks if it can fall by examining the cell below it with the canStandOn() method (similar to how Chara objects are checked). Here’s the World.js method:
    canStandOn(x,y) {
        if (this.isHitRock(x,y))
            return true;
        if (this.isHitPlayer(x,y))
            return true;
        return this.get_obj(x,y).can_stand_on;
    }
The conditions are that the cell below the rock isn’t another rock or player, and it must be an object with the can_stand_on property set to true. Check out the source code if you want to know which element’ can_stand_on is true.
The rock will fall when tunnel is created below it
As explained earlier, digging a tunnel involves replacing the location where the player has passed with an EHole object.
The definition of EHole is as follows:
const EHole = {
    can_go_through: true,
    can_up: false,
    can_stand_on: false,
    can_pick_up: false,
    can_dig: false,
    sprite_no: Elem.HOLE,
}
can_stand_on is set to false. This means that once it becomes an EHole, the rock determines that it can fall at this position using the call_fall() function. After that, it changes to State.FALL and begins to fall.
Screen Transition Animations
This game features a cool circular clip effect during screen transitions, common in retro games.
Here’s how it works:
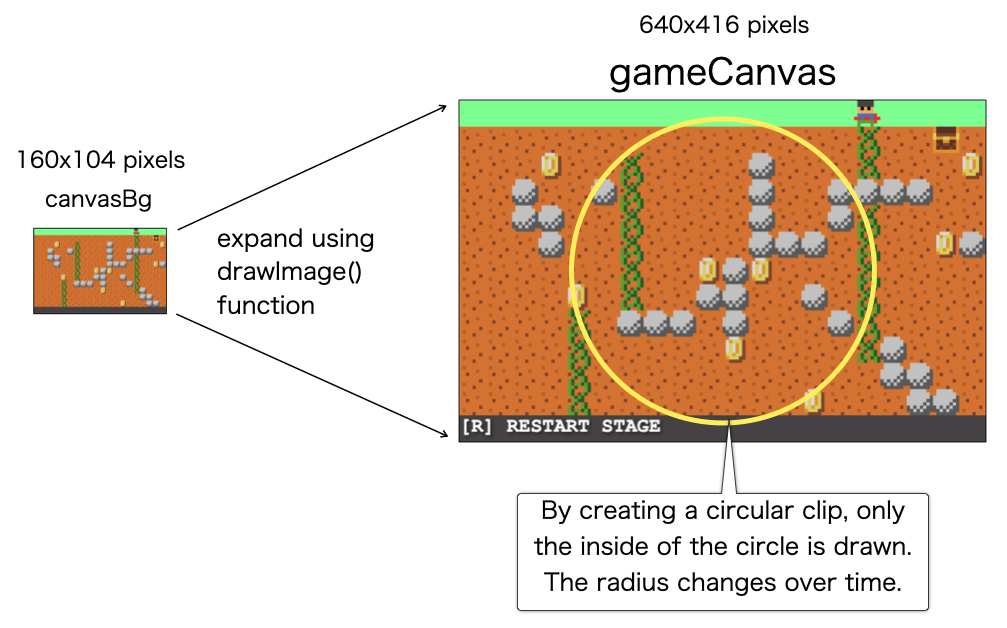
The game has two canvases, regardless of whether effects are applied.
The actual game screen size is a tiny 160×104 pixels. canvasBg represents this size but is hidden.
Since canvasBg is too small to play on, it’s displayed four times larger on the browser using another canvas, gameCanvas.
During gameplay, canvasBg is scaled up and drawn on gameCanvas every 30 milliseconds using drawImage(). By clipping the drawing area into a circle, you get the circular reveal effect.
The clip_circle() function in index.js handles this effect by changing the radius to scale and shrink the circle.
function clip_circle(radius) {
    context.save();

    context.beginPath();
    const cX = 320;
    const cY = 200;
    context.arc(cX, cY, radius, 0, Math.PI * 2);
    context.clip();

    context.drawImage(canvas_bg, 0, 0, canvas_bg.width, canvas_bg.height, 0, 0, canvas.width, canvas.height);

    context.restore();
}
By calling the clip_circle function over time, the animation for expanding and contracting the circular clip is executed. But how is the passage of time measured specifically?
In this game world, update() is called every 30 milliseconds, which is considered one frame.
The duration of the animation transition is set as the number of frames, and until it reaches the maximum frame, the radius of the circular clip is changed with each frame update to create the animation.
This frame-counting system can be made pretty versatile, no matter the animation effect, so it’s been implemented in the Animation class.
class Animation {
    constructor(frames, func) {
        this.num_of_frames = frames;
        this.frame = 0;
        this.func = func;
    }
    play(func) {
        this.frame++;
        if (this.frame > this.num_of_frames) {
            return {finished: true};
        }
        this.func(this.num_of_frames, this.frame);
        return {finished: false};
    }
}
Here’s the part where this class is actually used. The anim_clip_shrink and anim_clip_enlarge passed to the constructor are functions that call clip_circle to handle the expansion and contraction. To see what’s inside these functions, please refer to the source code.
・・・
    case State.TITLE:
      ・・・
        if (input.start) {
            state = State.LEAVE_TITLE;
            trans_anim = new Animation(70, anim_clip_shurink);
        }
        break;
    case State.LEAVE_TITLE:
        if (trans_anim.play().finished) {
            state = State.INIT_STAGE;
            trans_anim = new Animation(70, anim_clip_enlarge);
        }
        break;
・・・
Wrapping up
We’ve walked through how to make a game that pays homage to the classic 1980s puzzle game “MOLE MOLE.” The game is compact, with less than 1,000 lines of code. While its rules are minimal, it offers solid puzzle elements.
Creating this tiny 160×104 pixel world with 8×8 pixel characters brought me joy. I love things that are simple yet deep, and so far, this game hits that sweet spot in terms of enjoyment in game creation.
Before moving on to my next project, I plan to tinker with this game a bit more.
