In this article, I’m going to walk you through how to get your gamepad working in a web browser using JavaScript.
Motivation
I’ve been rebuilding a Lode Runner-style action puzzle game while writing a blog about it, and it’s shaping up pretty nicely under the name Treasure & Monster. At some point, I thought, “Hey, it would be cool to use a gamepad instead of just the keyboard.”
I knew JavaScript supported gamepads, but this was the first time I seriously tried to make it work with a game I’d created. When I actually started implementing it, I found that it didn’t work perfectly right out of the box, so I had to write some logic to handle gamepad input properly. I’ll explain all that in this post.
Buying a Gamepad
First things first: I needed to get a gamepad. Since I’m a Mac user, I was looking for something compatible with macOS. There are tons of gamepads out there, but surprisingly few explicitly mention Mac compatibility. In the end, I went with this one, which I liked the design of:
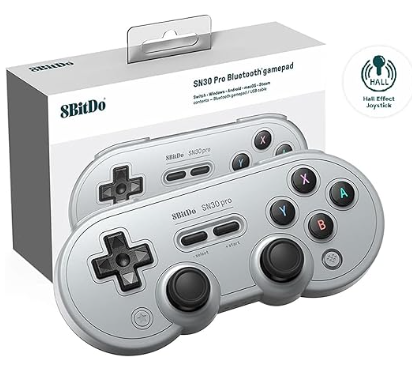
It has a NES style design, or kind of looks like an old PlayStation controller without the grips. It’s simple and doesn’t stand out too much—just the way I like it.
One thing I was worried about was that I don’t know the brand well, and the manual wasn’t available in Japanese. But after trying it with a game on Steam (which worked fine, of course), I had no issues.
By the way, while I was hunting for a gamepad, I found myself wondering why Apple isn’t putting any effort into gaming. Macs all use Apple’s own chips now, so there’s a consistency in hardware specs that’s very much like a gaming console. Plus, the Mac Mini is a crazy good deal for the price. I seriously think they could take over the console market if they really tried.
First Steps: Capturing Input Events
Next, I wanted to see if I could capture gamepad input events in the web browser with JavaScript, so I threw together a simple program to test it out.
It displays the number of the pressed button on the black canvas.
Here’s the source code. You can try running it in your browser:
<html>
    <center>
        <canvas id="canvas" width="512" height="256" style="border:1px solid #000000; background-color: #000;"></canvas>
<script>
    const canvas = document.getElementById('canvas');
    const context = canvas.getContext('2d');

    function draw_text_center(text) {
        context.fillStyle = "#fff";
        context.font = '24px Consolas';
        context.textAlign = 'left';
        let text_w = context.measureText(text).width;
        context.fillText(text, canvas.width/2-text_w/2, canvas.height/2);
    }

    function updateGamepadStatus() {
        const gamepads = navigator.getGamepads();
        const gamepad = gamepads[0];

        if (gamepad) {
            gamepad.buttons.forEach((button, index) => {
                if (button.pressed) {
                    context.clearRect(0,0,canvas.width, canvas.height);
                    draw_text_center(`button ${index} pressed`);
                }
            });
        }

        requestAnimationFrame(updateGamepadStatus);
    }

    requestAnimationFrame(updateGamepadStatus);
</script>
</center>
</html>
If your gamepad is working, it should display text indicating which button was pressed.
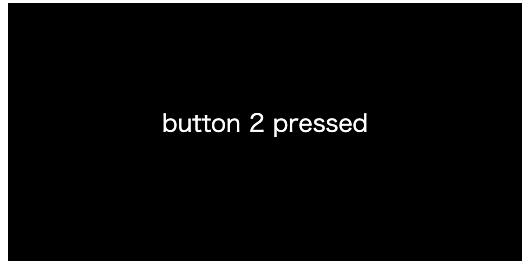
Button Numbers for the 8Bitdo SN30 Pro
The manual for the 8BitDo Pro is available as a PDF online, which was super helpful. The controller has quite a few buttons, including L3 and R3, which are the joystick buttons. I’ll save testing those for another day.
All the other buttons were easy to detect, except for the pairing button and the mysterious “star” button. Every other button’s input was recognized just fine.
The button numbers for this controller were as follows:
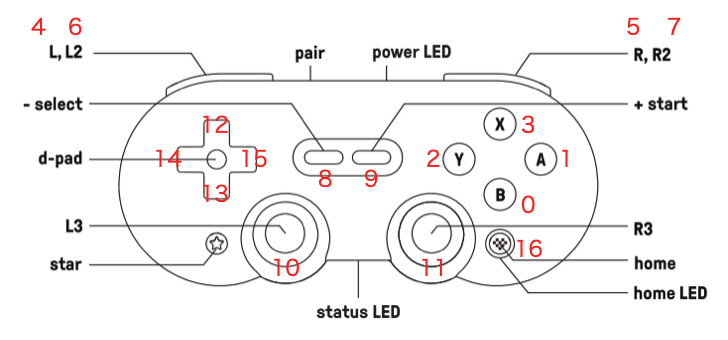
It turns out you can actually press the analog sticks L3 and R3, which is pretty cool.
I don’t know if there’s an industry standard for button numbers, but if they differ by manufacturer, it’s going to be a headache for game developers to keep up.
How to Detect Button Inputs
To handle gamepad input in a web browser, you’ll use the Gamepad API. There’s great documentation on this, so check that out if you need more details.
The Gamepad API doesn’t trigger an event when a button is pressed, like a keyboard does. Instead, you have to check the status of the gamepad at regular intervals.
The standard approach is to check the input state during each frame of the browser’s rendering cycle, like this:
// Call the function to check the gamepad state in the next frame (initial request)
requestAnimationFrame(updateGamepadStatus);

function updateGamepadStatus() {
  // Check the state of the gamepad
  ・・・
  // Call the function to check the gamepad state in the next frame again (this loops continuously)
   requestAnimationFrame(updateGamepadStatus);
}
Following code is showing how to handling gamepad in the function of updateGamepadStatus().
const gamepads = navigator.getGamepads(); // You can get all the connected gamepads
const gamepad = gamepads[0]; // Here, we're only looking at the first gamepad

if (gamepad) { // If there is a connected gamepad
    gamepad.buttons.forEach((button, index) => {
        if (button.pressed) {
           // index is the number of the pressed button, which lets you know which button was pressed
        }
    });
}
Issues Integrating It into a Game
While I was able to detect the button inputs, there were a couple of issues when I tried to integrate this into the game.
- Different from Keyboard Input
- No Way to Clear Input State
Different from Keyboard Input
Unlike keyboards, you can’t clear the input state whenever you want. With a keyboard, you get an event when a key is pressed or released, but gamepad input is constantly checked.
// Register the handler for when a key is pressed
document.addEventListener('keydown', keyDownHandler, false);
// Register the handler for when a key is released
document.addEventListener('keyup', keyUpHandler, false);

function keyDownHandler(event) {
    switch(event.key) {
    case 'j': world.player.move_left(); break;
    ・・・
    }
}

function keyUpHandler(event) {
  ・・・
}
The difference is shown in the diagram below.
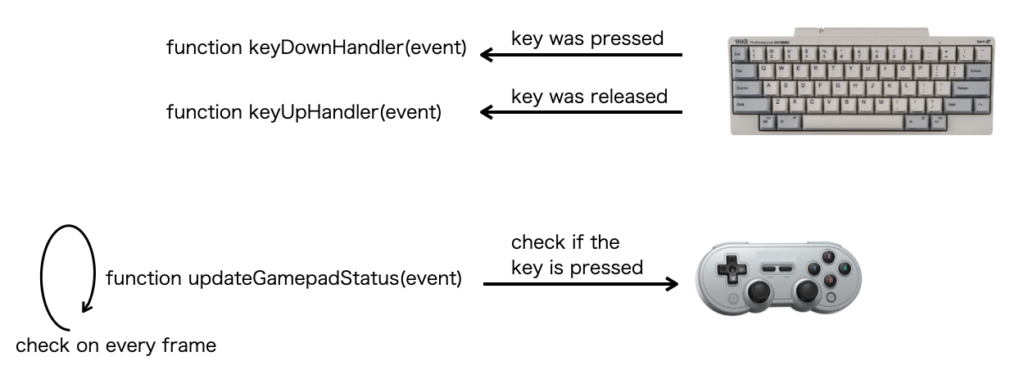
We want to keep the handling of input events consistent within the program.
No Way to Clear Input State
For example, as shown in the diagram below, if the Start button is pressed on the game clear screen, it transitions to the title screen, and if the Start button is pressed again on the title screen, it moves to the game start screen.
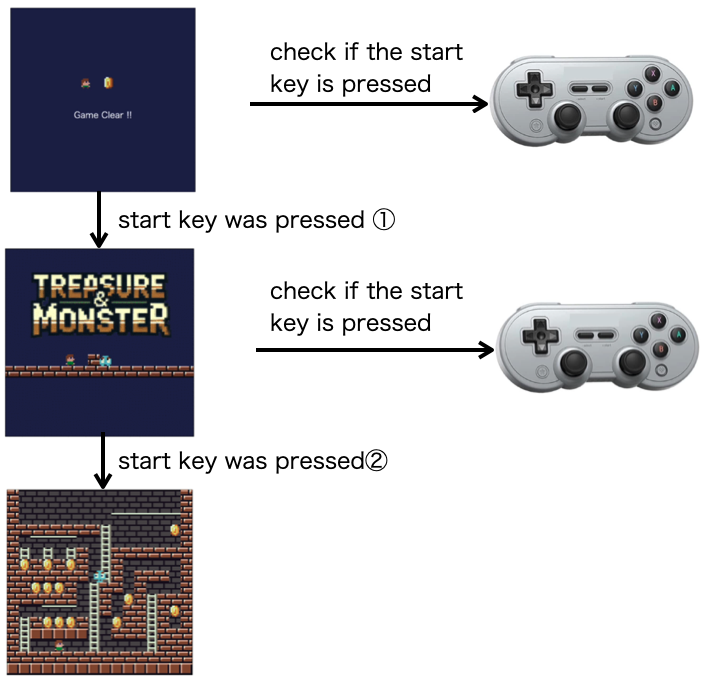
Ideally, we want the user to press the Start button twice—once for ‘Start Pressed ①’ and again for ‘Start Pressed ②.’
However, since the program continuously checks the gamepad state, it can’t tell if the user has released the button or is holding it down. In practice, the screen transition happens so quickly that the program checks the state before the user has time to release the button.
As a result, pressing the Start button once on the game clear screen skips over the title screen and jumps straight to the game start screen.
At this point, we’d like to clear the gamepad input state after ‘Start Pressed ①,’ but unfortunately, the Gamepad API doesn’t have a function to do that.
The only solution is to change how the game program detects gamepad input. If we handle gamepad input like a keyboard—triggering events when the button is pressed or released—this problem can be solved.
How to Solve These Issues
The solution to the two issues I mentioned is the same: instead of using the Gamepad API as it is, we can implement a system that triggers events when the button is pressed or released, just like with a keyboard.
That said, we don’t need a complicated system—just setting up the following GamePad class will do the trick.
class GamePad {
    constructor(no) {
        this.no = no;
        this.prev_pressed = [];
        this.listener_list = { 'pressed': [], 'released': [] }

        this.updateGamepadStatus = this.updateGamepadStatus.bind(this);
        requestAnimationFrame(this.updateGamepadStatus);
    }

    addEventListener(type, listener) {
        this.listener_list[type].push(listener);
    }

    notify_event(type, e) {
        let listeners = this.listener_list[type];
        for (let func of listeners) {
            func(e);
        }
    }

    updateGamepadStatus() {
        const gamepads = navigator.getGamepads();
        const gamepad = gamepads[this.no];

        if (gamepad) {
            // check the button status
            gamepad.buttons.forEach((button, index) => {
                if (button.pressed) {
                    if(!this.prev_pressed[index]) {
               // If the button was not pressed before but is now, trigger a "pressed" event
                        this.notify_event("pressed", { index: index });
                        this.prev_pressed[index] = true;
                    }
                } else {
                    if(this.prev_pressed[index]) {
               // If the button was pressed before but is now released, trigger a "released" event
                        this.notify_event("released", { index: index });
                        this.prev_pressed[index] = false;
                    }
                }
            });
        }

        requestAnimationFrame(this.updateGamepadStatus);
    }
}
Following code is showing how to use it.
let gamepad = new GamePad(0); // Create an object for the first gamepad (index 0)

// Register the event handler for when a button is pressed
gamepad.addEventListener("pressed", btnDownHandler);

// Register the event handler for when a button is released
gamepad.addEventListener("released", btnUpHandler);

function btnDownHandler(event) {
    switch(event.index) {
        case 0:
            // Write the process for when the B button is pressed
            ...
    }
}

function btnUpHandler(event) {
   ・・・
}
Conclusion
In this article, we looked at how to capture gamepad input in JavaScript for web browsers. By using the Gamepad API, it’s pretty easy to get a gamepad working, but since the API constantly polls for input, you need to do a bit of extra work to make it more user-friendly. I think by implementing a class that triggers events like with a keyboard, handling input events became much simpler and more intuitive.
This time, I only handled button events, but next time, I’d like to try capturing analog stick input and use it in a game.




コメント