In this two-part series, we’ll create a minimalist Tetris-like falling block puzzle game. We won’t use any game engines or libraries; instead, we’ll make the game using only plain HTML and JavaScript.
This guide is for people who:
Want to try making a game but have no idea where to start.
Just want to make a simple game without diving into complex tools like Unity or Unreal Engine.
We’re targeting people with a basic understanding of programming.
What to Read First
There is a Part 1 to this article. If you want to learn about implementing falling blocks, stacking, and line clearing, please read the article below.
What We’ll Create
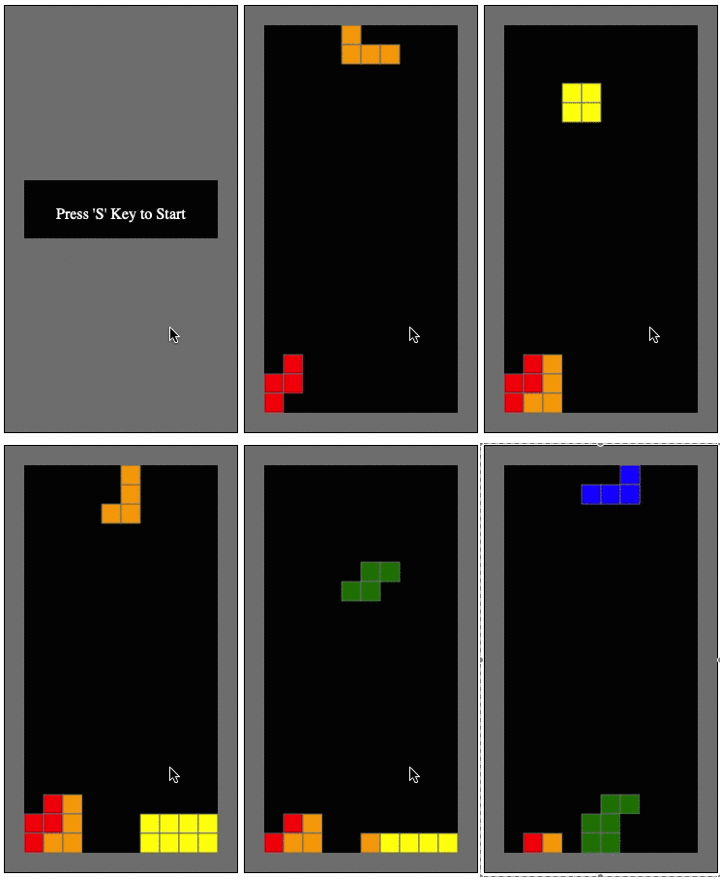
We’ll create a minimalist, playable version of a Tetris-like game. What we do in this article is to make following building-blocks:
- Adding seven block types
- Block rotation
- Managing the game state
Source Code
We’ve omitted some parts that are the same as in Part 1 or have already been explained in the article.
const canvas = document.getElementById('gameCanvas');
const context = canvas.getContext('2d');

const SCREEN_W = 10
const SCREEN_H = 20
const BLOCK_SIZE = 20

const State = {
    STANBY: 0,
    STARTING: 1,
    GAME: 2,
    GAME_OVER: 3
}

let screen = Array(SCREEN_H*SCREEN_W);

// position of block
let blockX = 5;
let blockY = 0;
let rotate = 0;

const blockShapeTable = [
// omitted
]

let blockType;

// game state
let gameState = State.STANBY;

// Input event handler
document.addEventListener('keydown', keyDownHandler, false);

function keyDownHandler(event) {
    if (event.key === 'Left' || event.key === 'ArrowLeft') {
        if (!blockHit(blockX-1, blockY, blockType, rotate))
            blockX -= 1;
    }

    if (event.key === 'Right' || event.key === 'ArrowRight') {
        if (!blockHit(blockX+1, blockY, blockType, rotate))
            blockX += 1;
    }

    if (event.key === 'd') {
        if (!blockHit(blockX, blockY+1, blockType, rotate))
            blockY += 1;
    }

    if (event.key === 'x') {
        new_rotate = (rotate+1)%4;
        if (!blockHit(blockX, blockY+1, blockType, new_rotate))
            rotate = new_rotate;
    }

    if (event.key == 's') {
        if (gameState == State.STANBY) gameState = State.STARTING;
    }
    if (gameState == State.GAME_OVER) gameState = State.STANBY;
}

function drawRect(x, y, color) {
    if (color==0) {
        context.fillStyle = 'black';
        context.fillRect((x+1) * BLOCK_SIZE, (y+1) * BLOCK_SIZE, BLOCK_SIZE, BLOCK_SIZE);
    } else {
        context.fillStyle = color;
        context.fillRect((x+1) * BLOCK_SIZE, (y+1) * BLOCK_SIZE, BLOCK_SIZE, BLOCK_SIZE);

        context.strokeStyle = 'gray';
        context.lineWidth = 1;
        context.strokeRect((x+1) * BLOCK_SIZE, (y+1) * BLOCK_SIZE, BLOCK_SIZE, BLOCK_SIZE);
    }
}

function drawScreen() {
    for (j = 0; j < SCREEN_H; j++) {
        for (i = 0; i < SCREEN_W; i++) {
            color = screen[ i + j*SCREEN_W ];
            drawRect(i, j, color);
        }
    }
}

function hasBrick(x,y) {
    if (x < 0 || x >= SCREEN_W || y >= SCREEN_H)
        return true;
    return 0!=screen[x + y*SCREEN_W];
}

function drawFallBlock(x, y, block, rotate) {
// omitted
}

function blockHit(x, y, block, rotate) {
// omitted
}

function putBlock(x, y, block) {
// omitted
}

function setBrick(x, y, block) {
    screen[x + y*SCREEN_W] = block;
}

// ・・・omitted

const WAIT_COUNT = 40;
let wait_count = 0;

function is_in_interval(count) {
    wait_count += 1;
    if (wait_count < count) {
        return true;
    }
    wait_count = 0;
    return false;
}

function update() {
    if (is_in_interval(WAIT_COUNT))
        return;

    if (blockHit(blockX, blockY+1, blockType, rotate)) {
        putBlock(blockX, blockY, blockType, rotate); // stack the block
        // check Game Over
        for (i = 0; i < SCREEN_W; i++) {
            if (screen[i] != 0)
                gameState = State.GAME_OVER;
        }
        initFallBlock();
        return;
    }

    checkLineComplete();

    blockY += 1;

}

function draw_text_center(text, color='#fff') {
    x = BLOCK_SIZE;
    y = canvas.height/2 - 40;
    context.fillStyle = 'black';
    context.fillRect(x, y, canvas.width-BLOCK_SIZE*2, 60);

    context.fillStyle = color;
    context.font = '16px Consolas';
    context.textAlign = 'left';
    text_w = context.measureText(text).width;
    context.fillText(text, canvas.width/2-text_w/2, canvas.height/2);
}

function initFallBlock() {
    blockX = 4;
    blockY = 0;
    rotate = 0;
    bsi = Math.floor(Math.random()*7);
    blockType = blockShapeTable[bsi];
}

function init() {
    initFallBlock();
    screen.fill(0);
    rotate = 0;
}

function clearScreen() {
    context.fillStyle = 'gray'
    context.fillRect(0, 0, canvas.width, canvas.height);
}

function draw() {
    switch (gameState) {
    case State.STANBY:
        clearScreen();
        draw_text_center("Press 'S' Key to Start");
        break;
    case State.STARTING:
        init();
        gameState = State.GAME;
        break;
    case State.GAME:
        clearScreen();
        drawScreen();
        drawFallBlock(blockX, blockY, blockType, rotate);
        update();
        break;
    case State.GAME_OVER:
        draw_text_center("Game Over!!", '#f00');
        break;
    }
}

setInterval(draw, 10);
Defining Block Types
There are seven types of blocks, as shown in the diagram below.
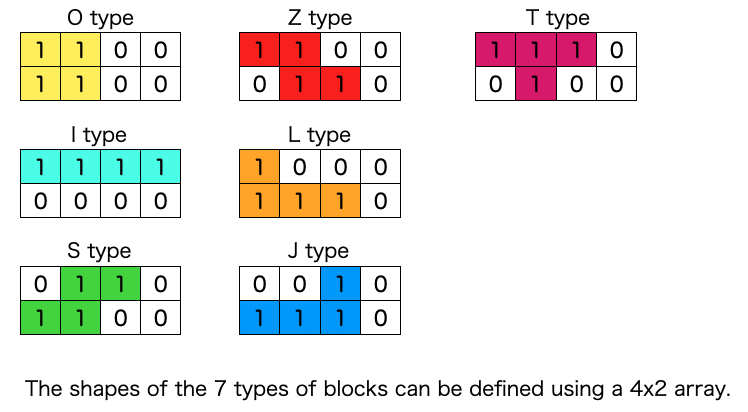
Although the shape can be defined in a 4×2 array, we’re implementing it in a one-dimensional array for easier handling. This is the relevant part of the source code.
const blockShapeTable = [
    {
        shape: [1,1,0,0,
                1,1,0,0], // O type
        color: 'yellow'
    },
    {
        shape: [1,1,1,1,
                0,0,0,0], // I type
        color: 'aqua'
    },
    {
        shape: [0,1,1,0,
                1,1,0,0], // S type
        color: 'green'
    },
    {
        shape: [1,1,0,0,
                0,1,1,0], // Z type
        color: 'red'
    },
    {
        shape: [1,0,0,0,
                1,1,1,0], // L type
        color: 'orange'
    },
    {
        shape: [0,0,1,0,
                1,1,1,0], // J type
        color: 'blue'
    },
    {
        shape: [1,1,1,0,
                0,1,0,0], // T type
        color: 'purple'
    }
]
Drawing and Rotating the Blocks
First, let’s explain the drawing of the falling block when it’s not rotated.
The block’s shape is represented by a 4×2 array of data. 0 means there’s nothing, and 1 means there’s a block piece. As shown in the diagram below, we go through the elements one by one, and if the data is 1, we draw a filled rectangle at the corresponding coordinates on the screen.
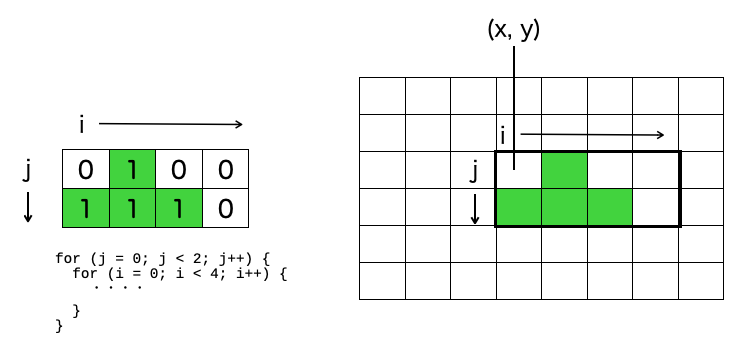
Assuming (x, y) is the top-left corner of the block’s shape data (i=0, j=0), for the block shape in the diagram, since there are pieces at (i=1, j=0), (i=2, j=0), (i=0, j=1), and (i=1, j=1), we draw rectangles at the coordinates (x+1, y), (x+2, y), (x, y+1), and (x+1, y+1).
Here’s the implementation in the source code. It’s the part under case 0: in the drawFallBlock() function.
function drawFallBlock(x, y, block, rotate) {
    for (j = 0; j < 2; j++) {
        for (i = 0; i < 4; i++) {
            if (block.shape[i+j*4]==1) {
                switch(rotate) {
                case 0: drawRect(x+i, y+j, block.color); break;
                ・・・
                }
            }
        }
    }
}
Rotating Left by 90°
Block rotation is achieved by changing the direction of i, j when drawing the block’s piece. When rotated 90° to the left, it looks like the diagram below.
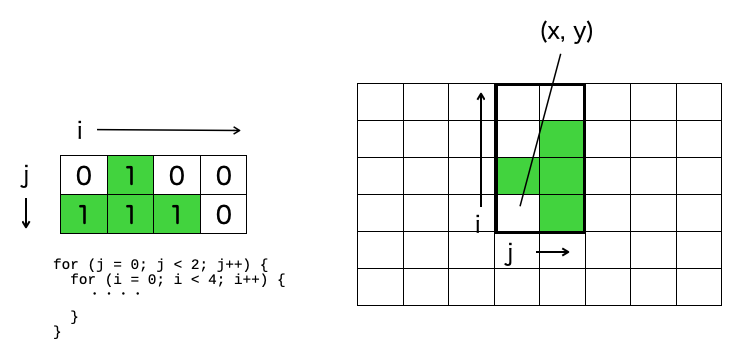
The code is the part under case 1: in the drawFallBlock() function. The key point is that the calculation of the drawing coordinates is (x + j, y ‒ i).
function drawFallBlock(x, y, block, rotate) {
    for (j = 0; j < 2; j++) {
        for (i = 0; i < 4; i++) {
            if (block.shape[i+j*4]==1) {
                switch(rotate) {
                ・・・
                case 1: drawRect(x+j, y-i, block.color); break;
                ・・・
                }
            }
        }
    }
}
Rotating Left by 180° and 270°

In the source code, these are under case 2: and case 3: in the drawFallBlock() function. Here’s the complete drawFallBlock() function.
function drawFallBlock(x, y, block, rotate) {
    for (j = 0; j < 2; j++) {
        for (i = 0; i < 4; i++) {
            if (block.shape[i+j*4]==1) {
                switch(rotate) {
                case 0: drawRect(x+i, y+j, block.color); break;
                case 1: drawRect(x+j, y-i, block.color); break;
                case 2: drawRect(x-i, y-j, block.color); break;
                case 3: drawRect(x-j, y+i, block.color); break;
                }
            }
        }
    }
}
Where to Set the Rotation Center?
To simplify the implementation, we set the rotation center at the top-left piece of the block’s shape data (i=0, j=0). While this is playable, some may feel that “the rotation isn’t smooth.” Even O-type blocks rotate in this case.
With a bit more effort, you could try changing the rotation center for each shape. If you’re interested, feel free to experiment with different implementations.
Collision Detection and Stacking in Rotated States
The logic is the same as drawing the falling block. The collision detection function and stacking function introduced in the previous article are the bases. You just need to add the logic for the rotation direction.
function blockHit(x, y, block, rotate) {
    // check 4x2 block shape data
    for (j = 0; j < 2; j++) {
        for (i = 0; i < 4; i++) {
            if (block.shape[i+j*4]==1) {
                flg = false;
                switch(rotate) {
                case 0: flg = hasBrick(x+i, y+j); break;
                case 1: flg = hasBrick(x+j, y-i); break;
                case 2: flg = hasBrick(x-i, y-j); break;
                case 3: flg = hasBrick(x-j, y+i); break;
                }
                if (flg) return true;
            }
        }
    }
    return false;
}

function putBlock(x, y, block) {
    // check 4x2 block shape data
    for (j = 0; j < 2; j++) {
        for (i = 0; i < 4; i++) {
            if (block.shape[i+j*4]==1) {
                switch(rotate) {
                case 0: flg = setBrick(x+i, y+j, block.color); break;
                case 1: flg = setBrick(x+j, y-i, block.color); break;
                case 2: flg = setBrick(x-i, y-j, block.color); break;
                case 3: flg = setBrick(x-j, y+i, block.color); break;
                }
            }
        }
    }
}
Managing Game State
To make it feel more like a game, we’ve created the following minimum state transitions.
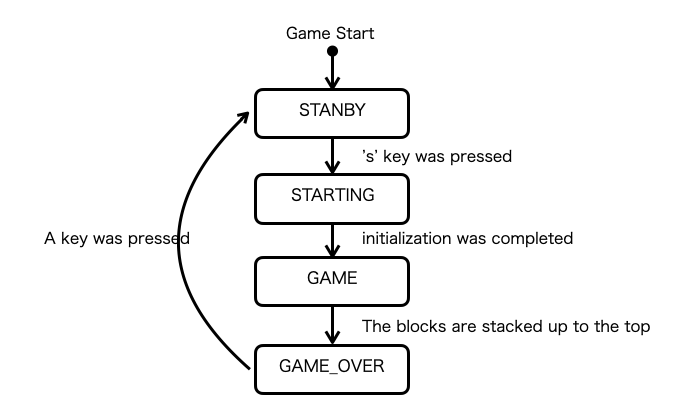
If you want to add more effects, like having the lines flash when they clear, you’ll need to add more states.
Next Steps
After Tetris, the iconic pioneer of falling block game, many variations of falling block games have appeared. I’m only familiar with “Columns” and “Puyo Puyo,” but there are many others if you search online. Creating these variations on your own can be quite fun.



コメント